Ginataan Totong

Posted by JMom | Monday, December 31, 2007 | , | 2 comments »

Photobucket

Commonly called ginataang totong (click on the link for the recipe), this is another coconut milk infused dessert with rice and toasted mung beans. Generally served as dessert or an afternoon snack, this is one of my entries for this month's Lasang Pinoy 22 - Rice to the Challenge.

I'm hosting LP this month, so make sure to submit a rice recipe if you have one. The deadline is today, but you know me, if you have one you're just rearing to submit, ignore the deadline and send it on anyway.


Visit our new blogs:
Amoores.com
Cooked from the Heart - our new food blog
Our New Backyard - garden & photo blog
Found Not Lost - about all the things we 'find' worth talking about

Roast Lamb Cooked from the Heart

Posted by JMom | Sunday, December 23, 2007 | | 0 comments »

Photobucket - Video and Image HostingHere is something that may be a good and easy addition to your holiday dinners. We had this roast not too long ago and it's delicious!


Visit our new blogs:
Amoores.com
Cooked from the Heart - our new food blog
Our New Backyard - garden & photo blog
Found Not Lost - about all the things we 'find' worth talking about

Gigantic Tapioca Pudding

Posted by JMom | Saturday, December 15, 2007 | | 1 comments »

Photo Sharing and Video Hosting at Photobucket


I love puddings, and one of my favorite if tapioca. However, tapioca puddings are usually made with tiny tapioca pearls, not these humungous ones. These large pearls are normally used for bubble drinks or boba which my girls have been addicted to and have been experimenting with making the drinks at home. With their unused pearls, I decided to make this version of the tapioca pudding.


Visit our new blogs:
Amoores.com
Cooked from the Heart - our new food blog
Our New Backyard - garden & photo blog
Found Not Lost - about all the things we 'find' worth talking about

Beef Stirfries

Posted by JMom | Thursday, December 06, 2007 | , , | 0 comments »

When I'm eating something that the rest of the family do no eat, I usually end up cooking a completely different dish for them. I lucked out when I cooked these two dishes on the same night. I simply had to double some of the ingredients then it was just a matter of stir frying one dish after the other.

Photo Sharing and Video Hosting at Photobucket Photo Sharing and Video Hosting at Photobucket

Click on the photos for recipes.

Visit our new blogs:
Amoores.com
Cooked from the Heart - our new food blog
Our New Backyard - garden & photo blog
Found Not Lost - about all the things we 'find' worth talking about

Cauliflower and Mushrooms

Posted by JMom | Wednesday, December 05, 2007 | , | 0 comments »

Photo Sharing and Video Hosting at Photobucket

I can't ever prepare a meal without vegetables. These are two of our vegetables separately. One night, feeling lazy to pull out too many dishes, I decided to combine these two, and not only did it turn out to be more colorful together, they also tasted wonderful together!

The recipe is really simple. Click here to cook Cauliflower and Mushrooms together.


Visit our new blogs:
Amoores.com
Cooked from the Heart - our new food blog
Our New Backyard - garden & photo blog
Found Not Lost - about all the things we 'find' worth talking about

Caramel Cake, in progress

Posted by JMom | Sunday, December 02, 2007 | , | 0 comments »


This is the first attempt at a recipe for caramel cake. I'm not quite happy with it yet, it's a little too sweet, but I'll be working on it.

Just because I'm not happy with it doesn't mean the recipe is not good, though. My girls liked it. If you'd like the recipe, click her to cook caramel cake.


Visit our new blogs:
Amoores.com
Cooked from the Heart - our new food blog
Our New Backyard - garden & photo blog
Found Not Lost - about all the things we 'find' worth talking about

Save your pumpkin seeds!

Posted by JMom | Thursday, November 29, 2007 | | 0 comments »

Photo Sharing and Video Hosting at Photobucket


If you still have pumpkins to carve or cook up into pies for the holidays, don't throw the seeds away! These toasted pumpkin seeds were delicious! Try them out and you'll be hooked too. I'm planning on making some more but this time with spicy flavors. They will be perfect for munching in front of the tv.


Visit our new blogs:
Amoores.com
Cooked from the Heart - our new food blog
Our New Backyard - garden & photo blog
Found Not Lost - about all the things we 'find' worth talking about

Carrot Soup

Posted by JMom | Wednesday, November 21, 2007 | , | 2 comments »

Carrot Soup

We cooked up some Carrot Soup in Our New Kitchen at the request of The Clone who, like the rest of us, has been suffering from the cold lately. She loves anything soupy and while she's never had carrot soup before, and I was a little unsure whether she would like it or not, I didn't have to worry. This soup was gone in no time! If you're not into pumpkin soup, this might be a good starter dish for Thanksgiving.


Visit our new blogs:
Amoores.com
Cooked from the Heart - our new food blog
Our New Backyard - garden & photo blog
Found Not Lost - about all the things we 'find' worth talking about

Bitter Melon and Oyster Sauce

Posted by JMom | Wednesday, November 14, 2007 | , | 2 comments »

Photo Sharing and Video Hosting at Photobucket

You won't believe how much bitter melon is waiting to get eaten up in my refrigerator right now. This is one of the simplest ways to cook bitter melon, just plainly sauteed with oyster sauce.

Get the recipe for Sauteed Bitter Melon in Oyster Sauce.


Visit our new blogs:
Amoores.com
Cooked from the Heart - our new food blog
Our New Backyard - garden & photo blog
Found Not Lost - about all the things we 'find' worth talking about

Southern Apple Cobbler

Posted by JMom | Friday, November 02, 2007 | , | 0 comments »

Photo Sharing and Video Hosting at Photobucket

I am a lazy baker so any dish where you don’t fuss over beating things and sifting things is my kind of baking. I didn’t want to be bothered with pie crust so I thought I would just dump things in a dish and bake; that’s how I came up with this concoction which is a combination of a Clafoutis recipe from Essential Desserts and a French Apple Cobbler recipe from Southernfood.about.com.

Read the rest of this entry »

Balatong: Mung Bean Soup

Posted by JMom | Friday, October 26, 2007 | , , , , | 0 comments »

Photo Sharing and Video Hosting at Photobucket

This is another dish where there are as many variations as there are regions in the Philippines. From the region that I come from, it is called "balatong". Some prefer it thick some like it soupy. Some like to put different types of vegetables with it. Me, I happen to like mine on the soupy side and I like it best with bittermelon (ampalaya) leaves. I had a couple of bittermelon plants come up in our garden this year, one was scrawny but the other one was lush and full of big pretty leaves. I just had to make this soup to use some of the leaves before the frost beats me to it.

Want to cook mung bean soup?


Chicken Bistek 2

Posted by JMom | Monday, October 15, 2007 | , | 1 comments »

Photo Sharing and Video Hosting at Photobucket

Often when I am being unimaginative, I always turn to old favorites and standbys. Guess what, most of them are the types that are quick and easy to make! So is it any wonder that we fall back again on Chicken Bistek on a day when we just did not feel like cooking anything elaborate but still needed to eat something filling anyway?

Click here for the recipe.

Spring Rolls

Posted by JMom | Sunday, October 07, 2007 | , , | 0 comments »

Photo Sharing and Video Hosting at PhotobucketI finally had a chance to try my hand out at making my own spring rolls and decided to have a wrap up day when the girls had their sushi rolling day. This would have been a great entry for Lasang Pinoy’s Binalot event, but things just didn’t synch up right and I missed the deadline.

Read the rest of this entry »

Zucchini Basil Muffins

Posted by JMom | Tuesday, October 02, 2007 | , , | 0 comments »

Photo Sharing and Video Hosting at Photobucket

I think I can finally start posting the backlog of recipes that I tried out this summer. I finally got all the little bugs out of the new website, or so I hope. Anyway, this zucchini and basil muffin was a pleasant surprise, using two ingredients from our garden in a new way.

Read the rest of this entry »

California Rolls

Posted by JMom | Friday, September 07, 2007 | , , | 10 comments »

Photo Sharing and Video Hosting at Photobucket
I was really hoping I would have the new site set up by now, but I just haven't found the right template or header design yet. I do like the three column design though. Anyway, since I'm still here, I thought I would post the girls' new obsession, their own maki sushi!

If you'd like to try your hand at rolling your own sushi, the California Roll is one of the easiest to make and also pleasing to most palates. For one, it doesn't have any raw fish for those who are still squemish about eating raw fish. My girls don't have that problem though, they love sashimi! I just haven't found any sashimi grade fish around our area. So California rolls and Shrimp sushi it is.

SUSHI RICE: start by cooking your desired amount of rice for sushi. While the rice is cooking, mix in a small bowl: rice vinegar, salt and caster (fine) sugar. If you noticed that I didn't give any proportions, that's because the amount of the seasonings will depend on how much rice you are using. As a starting point, for two cups of cooked rice I will probably use about three tablespoons of vinegar, a pinch of salt and maybe a half a teaspoon of sugar.

When the rice is cooked, transfer it to a bowl or large plate and stir to fluff it up. Drizzle the vinegar mixture over the rice and fold it in gently so as not to mash the rice. You can use a fan while your are mixing so that the rice will cool off faster and it will develop a slight sheen to it. When it is cool enough to handle, you can start making your sushi rolls.

The basic ingredients for these California Rolls are:
Nori(seaweed)
Crab Sticks
Carrots, cut into matchsticks
Cucumber
Wasabi (Japanese horseradish)

Here's a good place to learn how to roll your maki sushi, with step-by-step photos. Visit Sushi Day for a daily dose of sushi.


Moving on........ and on

Posted by JMom | Tuesday, September 04, 2007 | | 3 comments »

Sorry I hadn't been posting much. I am getting ready to move this blog so I am looking for a template and I am still busy setting up the new site. Just to give you a heads up, the new site will be at http://www.kitchen.amoores.com.

We're still eating and I'm still cooking, just haven't been blogging about food :) I'm cooking up something different most days, learning about three lettered things like PHP, SQL, FTP and the likes.

The girls have also gone back to school; two of them in high school and one in elementary. Time is moving too fast for me to stay on schedule!


Grilled Steaks

Posted by JMom | Wednesday, August 29, 2007 | , | 3 comments »

Grilled Steaks

This happens to me all the time. I start taking pictures of a dish then when it comes to the final photo, I forget because I'm too busy stuffing my face! That's what happened with these steaks. They were delicious and grilled just right, medium rare.

While the grill is setting up, marinate a couple of steaks (ribeyes in this case) in some chopped garlic, parsley, sage and thyme; juice from half a lemon, two tablespoons of olive oil and season with kosher salt and freshly cracked pepper. Grill over medium hot coals until medium well, about seven minutes each side.

Serve with your choice of sides. Ours was served with baked potatoes and cucumber & tomato salad from the garden.


Shrimp and Grits

Posted by JMom | Friday, August 24, 2007 | , , , | 3 comments »

Shrimp and Grits

Shrimp and Grits is an old Southern favorite with as many variations as there are cooks. This is my simple version. It is great as a light supper or a filling breakfast. This was a quick and easy supper for me and my husband while we were by ourself last month.

Shrimp and Grits recipe:

Aioli with Garlic Shrimp

Posted by JMom | Tuesday, August 21, 2007 | , , | 2 comments »

This is a slight twist on a previous recipe for Shrimp in Garlic Butter. For this variation, a garlic aioli is served as an additional sauce or dip for the shrimps.

Photobucket - Video and Image Hosting


Here's how to make aioli:

Crab Stuffed Mushrooms

Posted by JMom | Friday, July 27, 2007 | , , , | 7 comments »

Crab Stuffed Mushrooms

This is an old appetizer standby, and a favorite at parties. For parties, you probably should use smaller, bite sized mushrooms. This time though, I had some large mushrooms that were just waiting to be stuffed so I fixed this for dinner for me and the husband and still had plenty leftovers for lunch the next day. We had a nice big salad with plenty of tomatoes and cucumbers from the garden with these and they were delicious! It was a perfect, light summer dinner.

INGREDIENTS:
12 fresh mushrooms, large
3 Tablespoons butter
1/4 cup onions, chopped fine
2 cloves garlic, minced
1/4 cup spring onions, chopped
1 cup (a little over) lump crab meat
2 Tablespoons mirin
1/4 cup mayonaise
2 Tablespoons Parmesan Cheese
1/4 cup breadcrumbs
Salt/pepper to taste
Olive oil

Remove the mushroom stems and chop, set the mushroom caps aside. In a skillet, melt the butter and add the onions, garlic and chopped mushroom stemps. Saute' for a few minutes until they are fragrant, the onions are translucent and almost all liquids have evaporated. Stir in the spring onions, mirin, mayonnaise, parmesan cheese, and bread crumbs. Remove skillet from the heat and add the crab meat. Mix well and season with salt and pepper as needed.

Spoon the crab mixture into the mushroom caps and place them on a baking dish. Drizzle with olive oil and bake at 350 degrees F for 20 minutes.


Nachos

Posted by JMom | Tuesday, July 24, 2007 | , | 7 comments »

Photo Sharing and Video Hosting at Photobucket


This is one of the girls' favorite snack and they have become quite adept at making this snack themselves. We like to make our own tortilla chips by frying up leftover corn tortillas. They taste so much better than the store bought ones, we think.

For best taste, we like to make everything from scratch from the tomato salsa, the guacamole to the melted cheese.

MELTED CHEESE. If you've never melted cheese before, there are more than a couple of ways to do it. I will tell you about the two methods that the girls use. One is to simply melt it in the microwave; but if you're not careful you can end up drying the cheese out instead. To be on the safe side, add a little liquid, like a little salsa if you like it spicy, or a tablespoon of milk, to the cheese you are melting. Microwave on high for a couple of minutes, stop and stir. Keep doing this until the cheese is melted.
Another way is to melt it on top of the stove. Place the cheese and liquid in a small pot or saucepan and melt over low heat, stirring constantly until the cheese is melted.

GUACAMOLE. The taste of fresh avocados is hard to replicate and preserve so try to use fresh when you can. The pre-made and packaged guacamoles just cannot compare to freshly made ones. I have previously posted a recipe here. When the girls are being really lazy, they just mash up avocadoes and season it with salt pepper, and a spritz of lemon. You can adjust the guacamole recipe to suite your taste.

SALSA. All you have to do to make a refreshing salsa is mix together tomatoes, onions and cilantro. You can add hot peppers for spice. For this version of their nachos, the girls put the salsa ingredients through the blender and got a finer salsa. You can leave it chunky, or blend it as the girls did. Either way, it's still delicious.

Homemade Pork Tocino

Posted by JMom | Thursday, July 19, 2007 | , , | 15 comments »

TocinoThis recipe earned me the Rockin' Girl Blogger award from the Feisty Cook, Dexie. Although I've described the recipe in this blog previously, I've never really given a recipe since I don't ever measure when I'm making this. This time around though, at Peggy's request, I decided to measure out the marinade.

Continue to the Pork Tocino recipe.

Halo-Halo

Posted by JMom | Monday, July 16, 2007 | , , , | 7 comments »

It's summer time again for sure when you can't stay but a minute outside and you are already sweating and sticky without doing anything more strenous than lifting a glass of iced tea. I'm loving it though. It gives me an excuse to come up with cooling treats like Halo-halo.

Halo-Halo is the Filipino version of the summertime ice treat. Halo-halo, which means mix-mix literally, has its various renditions in different countries: Ice kakang in Malaysia, Es Teler in Indonesia, Ruam Mit in Thailand, Three Bean Drink/Rainbow Ice in Vietnam, and of course don't forget it's simpler sister, the Italian ice.

There are a great many versions of halo-halo so I won't put a recipe here, but here are more halo-halos on the web if you're interested in making your own.

  • Razon's Halo-halo - not a recipe but rather a review of one of the best places to get halo-halo. The girls and I tried this place at the Mall of Asia and loved it! It was simple but one of the best halo-halos we've ever tasted.
  • Halo-halo recipe from seasite
  • Market Manila Halo-Halo
  • Baby Rambutan's Halo-Halo

    As you may have noticed from the sampling of recipes for halo-halo, there isn't a strict recipe for it, put what flavors you like and enjoy!


  • Chicken marinating in pesto sauceOh it's grilling time again, and if you're blessed with lots of basil from your garden, it's probably pesto time also. We have been blessed with pesto for the second year in a row but as much as I love it, we just can't eat enough pasta and pesto to use it up. So we've been giving it away and using it up for other dishes like this grilled chicken marinated in pesto.

    Grilled Chicken with Pesto Marinade

    This is a very simple recipe. Just marinade the chicken pieces in pesto sauce for 30 minutes to overnight and grill.

    If you missed the pesto sauce recipe I use the first time, here it is again.

    2 Cloves of fresh garlic
    3 cups of fresh basil leaves, stems removed
    1/2 cup of pine nuts
    1/2 cup of grated parmesan cheese
    1/2 cup of olive oil

    In a blender, blend the above ingredients together until smooth. Done!

    COOKING TIP:
    From experience, I found that this sauce will last in the refrigerator for two to three weeks stored in an airtight container. You can also freeze this sauce and use it to flavor anything that requires a basil flavor. You can freeze small amounts for sauces in an ice cube tray then after they harden, transfer the cubes in a ziplocked freezer bag. It is best to freeze them in portions that you will need so you won't have to defrost the bags before using.

    If you are making a batch specifically for freezing, you can omit the parmesan cheese and pinenuts and add those fresh later when you are ready to use the basil.

    Clams with Black Bean Sauce

    Posted by JMom | Thursday, July 12, 2007 | , | 5 comments »

    Photobucket - Video and Image Hosting


    This is one of my favorite ways of cooking clams, and whenever I go to a Chinese restaurant that offers this, I never fail to order it. These clams, I found at Costco. Asi is my only daughter who shares this dish with me. She loves to put the sauce over her rice. When she and I are hungry, we can put away a whole order of this dish.

    Photobucket - Video and Image HostingWhen preparing fresh, live clams, make sure that all the shells are tightly closed. Or that they close up when you touch them. This means that the clams are still alive. There is nothing more disgusting than eating shellfish that has died before cooking. Their flesh deteriorates really fast that is why you have to cook them alive. Scrub the outside of the shells to make sure any mud, sand, or other impurities are removed. Wash them several times to get rid of any grit. It also helps if you soak clams in clean water for a few hours before cooking. This will allow them time to spit out any impurities like sand before cooking. Some suggests soaking them in milk too, but water works just as well I think.

    INGREDIENTS:Photobucket - Video and Image Hosting
    Fresh Clams (about 3 pounds or a big bowlfull)
    4 cloves garlic, chopped
    2 Tbsp. fresh ginger, minced
    1 large Onion, chopped roughly
    1 large Green Bell Pepper, cut into 1 inch squares
    1 bunch of Green Onions, cut into 1 inch length
    2 fresh hot chili peppers, cut into diagonal slices
    2 Tbsp. fermented Black Beans
    4 Tbsp. Oyster Sauce
    2 Tbsp. Oil
    1 tsp. cornstarch dissolved in water (about 1/4 cup or so)

    Heat oil in a wok or heavy bottomed pan. Saute' the chopped garlic and ginger for a minute then add the black beans. Lightly mash the beans to release the flavors and stirfy for another minute. Add the onions and bell peppers, stir, and add the clams and oyster sauce. Stir and cover the pot. Let it cook/steam for about 5 minutes until the clams have opened. Remove any clams that did not open up. The clams should have released some liquid at this point. Add the cornstarch mixture to thicken the sauce, stir in the chili peppers and green onions. Serve over rice. Lots of rice!

    Creamy Mango

    Posted by JMom | Monday, July 09, 2007 | , | 4 comments »

    Photo Sharing and Video Hosting at Photobucket


    Before the girls left for summer vacation, we bought a pack of ataulfo mangoes from Costco, which in the past have been very good, but this time they were not too sweet and were on the verge of getting over ripe. We decided to just scoop out all the flesh and make a puree out of it. We weren't really sure where we were going with this puree. I was seriously considering mango cake but just didn't have the energy for it. With dinner time looming and still had some prepping to do before our company arrived, we decided to just dump the whole thing in the ice cream maker and this is what came out.

    Like I said, I was feeling really lazy and didn't want to deal with making custard and such for a traditional ice cream recipe, so I omitted the eggs and just went for pure cream and mango puree mixture.

    4 ataulfo mangoes, pureed (about 2 cups)
    3 cups heavy cream
    1.5 cups caster sugar (super fine)
    pinch of salt

    Mix all the ingredients and pour into an ice cream maker. Process until set and serve. You can save leftovers, if any, in the freezer.


    Eggplant Fritata

    Posted by JMom | Thursday, July 05, 2007 | , , , | 2 comments »

    Eggplant Fritata

    The girls are off to summer at grandma's house so it is just me and hubby at home again. Sometimes when we are feeling particularly lazy we cook an egg dish for a quick supper and since I am still trying to clean out the fridge of odds and ends, we decided to have this for a light supper. I only had one Japanese eggplant left in the crisper, and not much other vegetables to pair it up with so eggplant fritata it is.

    Eggplant Fritata side 2

    Since Japanese eggplants are relatively mild and thin skinned, I simply sliced them and quickly pan fried the slices in a bit of olive oil. Set them aside and scramble about 4 eggs and season with salt and pepper. Heat a couple more tablespoons of oil in the skillet and pour the egg mixture in. Let the eggs set about halfway, then place the eggplance pieces on top of the egg. I also had some left over chopped tomatoes so I just threw those in too. Carefully turn the omelet over and cook on the other side. Serve.

    Tip on turning a whole omelet over: After the egg has set half way, meaning the bottom is fairly cooked but the top is still runny, slide the omelet onto a plate. Holding the plate in one hand, carefully cover it with the skillet facing down, quickly flip it over, remove the plate and return the skillet to the stove.

    Photo Sharing and Video Hosting at Photobucket

    The first to fluorish in our backyard garden are the green beans. We have had an abundance of them and we've cooked them every which way imaginable. This is one of the simplest ways of cooking green beans, and it's an old standby in our kitchen.

    INGREDIENTS:
    Green Beans
    Onion, chopped
    Tomatoes, chopped
    Olive Oil
    Salt and Pepper

    I didn't put any proportions on purpose because most of the time it depends on how much green beans I have on hand and what mood I'm in. Experiment with the proportions according to your taste. This is very basic, all you have to do is heat some oil and sautee the tomatoes and onions. After they have softened and become fragrant, add the green beans and season with salt and pepper. I don't add any water, I just wash the green beans prior to putting them in the pot and the moisture remaining on them is usually enough to cook them through. Cover and cook for five minutes. I put the timer on for this so as not to overcook the beans. We all have soggy green beans.

    Shrimp with Garlic Butter

    Posted by JMom | Tuesday, June 26, 2007 | , | 3 comments »

    Photobucket - Video and Image Hosting

    Aside from plainly boiling them, this is probably the simplest way to fix shrimps. Lately, rather than making pasta and shrimps, I've been cooking the shrimps this way separately so as not to get any essence of seafood for The Clone who will not touch any food tainted by the sea.

    To make this dish, prepare:
    Shrimps (head-on or less, peeled or not - your choice)
    5 cloves of garlic, chopped
    1 stick of butter
    3 Tablespoons of flat leaf parsley
    Salt & Pepper to taste

    Melt the butter in a skillet at high heat and briefly saute' the garlic before adding the shrimps. Quickly stirfry until the shrimps turn pink, add the parsley and season with salt and pepper to taste. Serve over pasta or with good french bread and wine.

    Zucchini Fritters

    Posted by JMom | Sunday, June 24, 2007 | , , , | 3 comments »

    Photo Sharing and Video Hosting at Photobucket


    See the full recipe for zucchini fritters.

    What's for brunch?

    Posted by JMom | Thursday, June 21, 2007 | , | 4 comments »

    BRUNCH = is the meal that is not breakfast, not lunch, but something in between.

    Whether I knew it or not, I've always been a 'bruncher' because I've never been an early riser nor organized enough to have a decent breakfast at the appointed time. Brunch is more the time when I take my first meal; that period sometime after 9am but before noon.

    Peggy at What's Cooking in Carolina asked, Breakfast or Brunch?

    Well, ever since I moved to North Carolina, I've totally embraced Southern cuisine. Well, I would probably embrace any cuisine, but hey. A girl's gotta eat. So in our kitchen, breakfast usually means Southern or Filipino breakfast. So please indulge me as I re-post for this meme, a previous post I made last year about Southern vs. Filipino Breakfast:

    My husband loves breakfast, and since the girls went on summer vacation, we have been indulging too much. We've even had breakfast food for late dinner! We got us some true blue country ham, which reminds me of tuyo (salted, dried sardines), strangely enough, because of it's saltiness, and it's strong smell. It smells a bit like funky feet, but if you can get past that, which really, it dissipates as it cooks, is really quite delicious.
    Image hosted by Photobucket.com
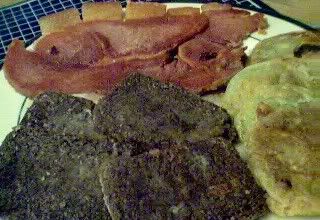
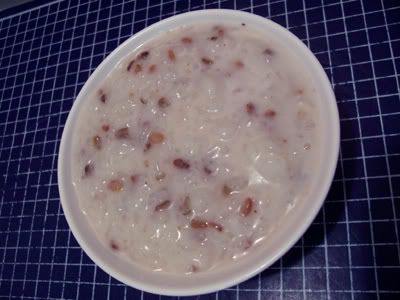
    On this day, since we had plenty of green tomatoes, we decided to have some fried green tomatoes along with liver pudding (another southern specialty) and country ham, of course accompanied with buttery grits. Yummy cholesterol heaven!

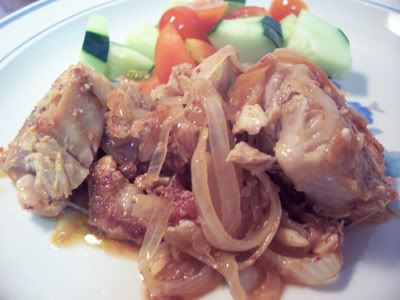
    The ham is so salty that I parboiled it first and threw out the first water, added a bit more and boiled it down until all the liquid has evaporated and the ham started to sizzle and take on some color. After the ham has browned, my mother in law used to deglaze the pan with coffee, producing what they call red-eye gravy which is then drizzled over the grits. I like frying rice in the same pan and getting that good country ham flavor all over the fried rice.

    I have also taken a liking to fried green tomatoes which is simply dredged in flour and fried. We couldn't wait for the tomatoes in the garden to ripen, so this was a great way to have a sampling.

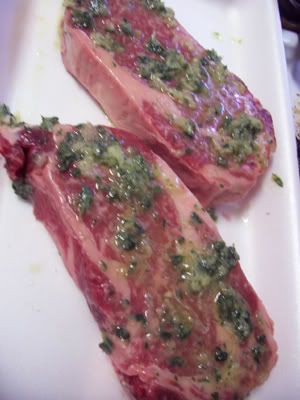
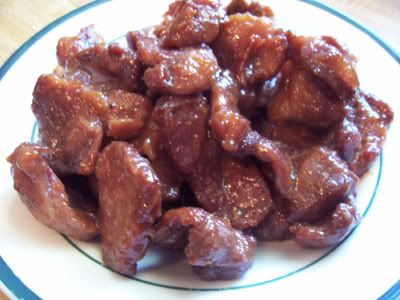
    In contrast, this is my hubby's favorite Filipino breakfast meat, tocino.
    Image hosted by Photobucket.com
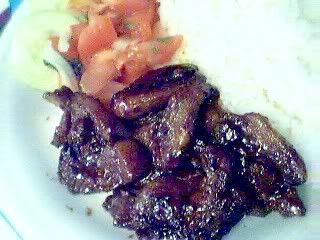
    This was my first attempt at making tocino at home, and it wasn't too bad, if I do say so myself. I simply marinated thin slices of a boston butt pork roast in apple cider vinegar, soy sauce, brown sugar, and black pepper. No coloring, so this doesn't have the usual reddish color, but the flavor was good. I cooked the tocino over low heat until all the liquid evaporated and the marinade started to caramelize and take on that golden color. Tip from my dad: cook it slow, don't over cook it, and you will have a tender tocino. It worked!

    If you'd like to see more breakfast dishes, check our archives here. I tag everyone who reads this post and loves breakfast or brunch to tell about your favorite things to eat for breakfast or brunch. If you're into the liquid brunches, that's fine too ;-)


    Chicken and Potatoes in Cream Sauce

    Posted by JMom | Tuesday, June 19, 2007 | | 4 comments »

    Photo Sharing and Video Hosting at Photobucket
    This dish is a variation of the Sassy Chicken with Mushroom and Sour Cream which was a recipe borrowed from the PinoyCook. These chicken and cream dishes have fast become a favorite in our kitchen both for their flavor and convenience. The boneless skinless chicken thighs that I buy in bulk from Costco are perfect for this dish because they are pre-proportioned so all I have to do for a quick meal is defrost a couple of packs in the microwave and I can have dinner on the table in less than an hour.

    Continue on if you would like the recipe.
    INGREDIENTS:
    10 boneless, skinless chicken thighs cut in pieces
    4 cloves garlic, chopped
    1 large onion, sliced
    1 Tbsp. fresh Thyme
    2 Tbsp. fresh Flat Leaf Parsley
    3 Potatoes, cubed
    1 stick (1/2 cup) Butter
    2 cups cream
    Salt, to taste
    Dash of Red Pepper Flakes (1/4 teaspoon)

    I'm a big fan of one pot cooking since, as you probably already know how I hate washing dishes. If you do this in the right order, you won't need to dirty up another pot.

    First in a skillet, melt the one stick of butter and brown the potato cubes. You don't have to cook them all the way through, just get some color on them. Take them out and set aside. In the butter remaining, saute' the garlic and onions for a minute or two then add the chicken pieces. Stir and saute for a few more minutes until they start to turn opaque. Season with salt and pepper and add the thyme and parsley. Add the 2 cups of cream and lower heat to a simmer. Stir, add the reserved potatoes and cover. Let it simmer for about 20 minutes making sure that the liquid does not evaporate too much (add more cream if necessary). Remove from heat when the chicken and potatoes are cooked all the way through and the sauce has thickened slightly. Adjust seasonings and serve.

    Fried Turnip Roots

    Posted by JMom | Monday, June 11, 2007 | , , | 3 comments »

    Photo Sharing and Video Hosting at Photobucket

    We got these gorgeous turnip roots from the garden the other day and I wanted to cook them right away to take advantage of their freshness. Normally, I would simply cook these roots along with the greens or just boil them and simply buttered. This time around, I wanted to try something new because the 'simply boiled' recipes just was not such a big hit with the girls.

    I thought I would try pan frying them, much like you would potatoes. It was a hit! The girls loved them cooked this way and we almost finished the whole dish in one sitting!

    Photo Sharing and Video Hosting at Photobucket


    INGREDIENTS:
    Turnip roots, sliced into 1/4 inch thickness
    1 large onion, chopped
    1 stick butter (1/2 cup)
    Salt & Pepper to taste
    1/2 cup Water

    Melt the butter over medium heat. Place the turnips and onions and pan fry on one side for a few minutes until they start to get some color. Turn over and let it brown some more. Add 1/2 cup water, season with salt and pepper and cover. Let it cook until all the liquid has evaporated and it starts sizzling again. Adjust the seasoning and serve.

    Checkerboard Parfait

    Posted by JMom | Sunday, June 03, 2007 | , , | 6 comments »

    Photo Sharing and Video Hosting at PhotobucketThis recipe was cooked up by ASI based on the 'Frozen Chocolate and Berry Chequerboard Parfait' from the Crazy for Chocolate cookbook, part of the Kitchen Library Series by Bay Books.

    She did everything by herself, and except for a minor glitch where her beaten egg did not quite peak and had to start over again, she did quite well for her first attempt. We luckily had some very good strawberries on hand, and they were delicious in this dessert. The recipe also suggested raspberries as a good alternative or in addition to strawberries, but this time we couldn't find raspberries in the store so this recipe only has strawberries.

    The process took several steps and many bowls, but she did very well following the directions. Now if only she would learn to clean up after herself :)

    Recipe follows...
    WHITE LAYER:
    1 cup white chocolate, melted
    4/4 cup heavy cream plus 1/2 cup heavy cream, extra
    2 eggs, separated

    BERRY LAYER:
    9 oz. fresh strawberries
    1/2 cup white chocolate, melted
    1 Tablespoon caster sugar
    1/4 cup heavy cream plus 1/2 cup heavy cream, extra
    2 eggs, separated

    Prepare a loaf pan sized container, about 4x10x3 inch, by covering the insides with plastic wrap. Separate the eggs.

    WHITE LAYER
    Combine the white chocolate and 1/4 cup cream in a bowl and place on top of simmering water (double boiler). Stir the mixture gently until the chocolate is melted. When it is completely melted, slightly beat the 2 egg yolks and temper by adding a spoonfull of the melted chocolate mixture to warm it up, then slowly incorporate the egg yolks into the chocolate and cream mixture until well blended. Remove from the heat and let cool. In the meantime, in a separate bowl, whip the extra 1/2 cup of heavy cream until soft peaks form. Then again in another bowl, beat the egg whites until soft peaks form (this is where Asi messed up the first time around because she didn't clean her beaters coming from whipping the cream. You have to make sure the beaters and bowl are dry and grease free or the egg whites will not attain peaks).

    Using a spatula, gently fold in the whipped cream and egg whites into the white chocolate mixture and pour into the pan. Place in the freezer to firm up while you work on the next layer.

    BERRY LAYER:
    Place the strawberries in a blender or processor and process until smooth. In a separate bowl, combine the white chocolate, sugar, 1/4 cup cream and melt over a double boiler as in the first process with the white layer. When the chocolate is melted and the mixture is well blended, temper the egg yolks as before by first adding a spoonful of the warm mixture into the egg yolks then slowly pour the yolks into the chocolate/cream mixture. Stir together until smooth and blended. Set aside to cool.

    Again, as before, beat the remaining half cup of cream into peaks and the egg whites also beaten in a separate bowl until soft peaks form. Fold the cream and the beaten egg whites into the berry mixture and pour on top of the white layer. The white layer should be at a soft freeze stage by this time. Return the pan in the freezer and let harden for at least three hours or overnight.

    PUT IT TOGETHER:
    Unmold the parfait from the pan by turning it onto a board and pulling it loose by the plastic wrap. You'll have to work swiftly to keep it from melting. Cut the bar lengthwise into four. Turn every other segment to get the checkerboard effect, and push them back together. Place a large piece of platic wrap over the block and place the pan back over. Gently turn up and return to the freezer while you prepare the berry sauce.

    BERRY SAUCE:
    In a blender, mix 1 pound of strawberries, 2 teaspoons of caster sugar, and 1/2 cup of water and blend until smooth and of pourable consistency.

    SERVE:
    To serve, unmold the parfait again by turning on a board and pulling on the plastic wrap. Slice the block crosswise to get the checkerboard design. Pour some berry sauce on a plate and place a slice of the frozen parfait on top of the sauce. Garnish with whole strawberries, and enjoy!


    LP18 - Grilled Vegetables

    Posted by JMom | Thursday, May 31, 2007 | , , , , | 6 comments »

    It is time for Lasang Pinoy again, and for this 18th round our host is Toni of Wifely Steps who chose this month's theme of vegetables! Whether you love them or hate them, we will be writing about Filipino or Filipino inspired vegetable dishes.

    In Our Kitchen, vegetables are a no brainer. Any will do, cooked or not, in any which way. I think our favorite way though is AS IS, vegetables that are as close to their natural flavors as possible; that is why salads, simply dressed are so popular at our table.

    Here are some 'close-to-traditional' (since I don't ever do anything the authentic way) vegetable dishes that have been published on this blog previously.
    Vegetable Adobo
    Pinakbet Tagalog
    Ampalaya (bittermelon) with Eggs
    Kamote Salad
    Gising-Gising
    Ginisang Sayote

    These are variations on the theme or Filipino 'inspired' dishes:
    Steamed Garden Vegetables The simplest way of cooking, and also the best way to bring out natural flavors of vegetables.
    Green Beans, Tomato & Cilantro Salad
    Green Beans with Lemon and Soy Sauce
    Shrimp & Vegetables Sinigang sa Miso (in miso soup)
    Collard & Beet Greens in Coconut Milk (sa gata)

    For LP-18, I offer another variation to an oft used theme of dressing vegetables with the 'filipino salsa' of onions, tomatoes, lemon and fish sauce.


    It's grilling time again here in the U.S., and with the past three day holiday, our grill has been on overdrive. This is part of what we cooked on the grill for Memorial Day. Again as with may dishes in our kitchen, it is a cross between the usual grilled vegetable that is dressed with a type of Italian style dressing and the Filipino way of tomatoes, onions, lemon and fish sauce. It is a variation from the traditional Eggplant Salad.

    This dish would be perfect for a large crowd and can be cooked ahead of time as the marinating process adds so much to the flavor.

    Start by grilling eggplants (I used the large globe eggplants that are more common in the grocery stores) which have been cut into 1/4 inch thick rounds and drizzled with olive oil, salt, & pepper. Do the same to zucchini squashes or yellow squashes that have been halved or quartered lengthwise.

    On a platter with sides or bowl, layer first the grilled eggplant slices, then the grilled squash. To these layers add a layer each of tomatoes and sweet onions, then sprinkle with chopped cilantro.

    In a separate bowl or cup, mix together equal amounts of soy sauce, balsamic vinegar, and olive oil until well blended and pour over the vegetable layers. Let stand at room temperature for at least 30 minutes or refrigerated for as much as overnight.

    I purposely didn't add any measurements for the dressing as this will depend on how much vegetables you are using. For a small platter, you can start with two tablespoons each, for instance and just increase the proportions according to your needs.

    For the roundup of LP18 participants, visit Toni's Wifely Steps.


    Menudo

    Posted by JMom | Saturday, May 26, 2007 | , , | 3 comments »


    Read all about this delicious bowl of menudo.

    Mara Pizza

    Posted by JMom | Monday, May 21, 2007 | , , | 3 comments »

    Mara PizzaThis girl loves pizza. Especially the kind of pizza that she makes herself and gets to know really well if you know what I mean. She has gotten so good at this pizza making thing that she can now make her own pizza from start to finish. All I have to do is proof the yeast for her first, and she does the rest.

    Here's how she makes her pizza...

    How many ways can you do egg? Probably too many to count. The egg is probably the most versatile food product there is. It can go from delicate to hardy, from simple to sublime as easily as water pours from plastic to crystal and vice versa. Eggs can be served for breakfast, lunch and dinner, even dessert! Not many food items can claim that. So is it any wonder that my photobucket, upon review is peppered with diffent versions of egg dishes?

    Here are a few of my favorite ways with eggs:

    Corned Beef Hash with Eggs

    Sassy Sarciado

    Posted by JMom | Wednesday, May 02, 2007 | , , | 2 comments »

    Sassy Sarciado


    See the recipe for Sassy Sarciado.

    Sweet Onion Spaghetti

    Posted by JMom | Thursday, April 19, 2007 | | 7 comments »

    Photo Sharing and Video Hosting at Photobucket


    Click here or on the photo for the Sweet Onion Spaghetti recipe.

    ss_blog_claim=02daf6afd7df9760eca81610469cb81e