
Our little backyard garden has been doing well and we've again been enjoying the bounties of summer but, even with us sharing our harvest with family and friends, we still end up with a welcomed surplus. I'm not that big on canning (I've exploded one or two jars before) so I tend to freeze a lot of vegetables. I want to share a few tips I've learned from experience and from the web on freezing vegetables and food in general.
Cool Before Freezing - This applies to cooked food and some vegetables that need to be blanched first before freezing. Make sure they are totally cool before sticking them in the freezer. As explained below, moisture causes ice to form on the outside of the food you're freezing that in turn causes freezer burn. It's that frozen taste you occasionally get when eating previously frozen food. Well when you don't cool your food down all the way before freezing, it causes it to sweat in the freezer thus creating the icy crystals. Plus, when you put warm things in the freezer, it works harder to stay cool and uses up more energy.
Packaging - to avoid ice crystals and thus freezer burn, try to use packaging that will eliminate as much air as possible. The thicker freezer bags work well in protecting your food from icing up. Another technique is to double up your wrappers. Wrapping up first in plastic, taking out as much air as you can, then wrapping again with foil really keeps out any moisture that can cause icing.
Some ziplok freezer bags now come with the gadget to suck all the air out.
Pack Thin - I used to cram as much food in a ziplok bag as I can thinking this would eliminate the extra space where air and moisture can form. But when it came time to use the food, it was either too much for my use or too hard to defrost. It's better to freeze your food in the servings that you're going to use. There's five of us so my portions are larger than for a household of 2 or 3. And rather than just throwing a lumpy bag in the freezer, lay them out in cookie sheets first then stick them in the freezer. After they harden, you can just stack them up in one corner, saving space and utilizing the space that you have more efficiently.
Label - You may think you'll remember that the green stuff is greens and you just might and that's all good and well. But what if you have collard greens, and mustard greens and kale and chard, and so on? How are you going to tell them apart then? The best way is to label all your packages. I usually write down what's in the bag and the date that I put it in the freezer. That way, I'll know to use the older ones first before the newer ones.
If you're organized enough (which I'm not), you can also keep a list outside of the freezer. Either taped to the front of it or in a notebook nearby, list the contents of your freezer that way you won't have to go riffling through the whole freezer looking for something you swear you froze but forgot that you already ate it. Not that it ever happened to me, mind you.
Visit our other blogs:
Amoores.com
Cooked from the Heart - our new food blog
Our New Backyard - garden & photo blog
Found Not Lost - about all the things we 'find' worth talking about
 No matter how long we've been cooking or puttering around in the kitchen, we never really know everything that goes on in the kitchen. Here are a few more hints that maybe you didn't know about or have forgotten (This isn't the whole list, I only took what I've tried and know to work or something that I would do myself):
EGGS
To determine whether an egg is fresh, immerse it in a pan of cool, salted water. If it sinks, it is fresh~if it rises to the surface, throw it away.
Poke an egg with a small sewing needle before hard-boiling, and the egg will peel with ease! And hold that needle in place with a magnet refrigerator clip!
To prevent egg shells from cracking, add a pinch of salt to the water before hard-boiling!
Brush beaten egg white over pie crust before baking to yield a beautiful, glossy finish!
PRODUCE
To keep potatoes from budding, place an apple in the bag with the potatoes!
Zap garlic cloves in the microwave for 15 seconds and the skins slip right off!
Mash and freeze ripe bananas, in one-cup portions, for use in later baking~no wasted bananas (or you can freeze them whole, peeled, in plastic baggies).
To get the most juice out of fresh lemons, bring them to room temperature and roll them under your palm against the kitchen counter before squeezing. Microwaving them for 10 seconds also works.
Wrap celery in aluminum foil when putting in the refrigerator it will keep for weeks!
To ripen avocados and bananas, enclose them in a brown paper bag with an apple for 2-3 days!
Fruit Freshener - Use 2 vitamin C tablets in a big bowl of water...let them dissolve and stir...dunk any veggie or fruit and it will stay fresh for a couple of weeks and vitamin C won't hurt you either! Try it out on a potato... dunk the potato and leave it out on the sink..it won't discolor... It's the short version of "fruit fresh ".
TECHNIQUES
Use a meat baster to "squeeze" your pancake batter onto the hot griddle~ perfect shaped pancakes every time!
Stuff a miniature marshmallow in the bottom of a sugar cone to prevent ice cream drips!
Use a pastry blender OR potato masher to cut ground beef into small pieces after/during browning. The potato masher is also great for mixing meatloaf.
Sweeten whipped cream with confectioners' sugar instead of granulated sugar~it will stay fluffy and hold it's shape better!
If you don't have enough batter to fill all cupcake tins, pour 1 tablespoon of water into the unfilled spots...this helps preserve the life of your pans
To easily remove honey from a measuring spoon, first coat the spoon with nonstick cooking spray. Or just slide off with your fingers and lick :)
Run your hands under cold water before pressing Rice Krispies treats in the pan~the marshmallow won't stick to your fingers!
To quickly use that frozen juice concentrate, simply mash it with a potato masher~no need to wait for it to thaw!
Spray your tupperware with non-stick cooking spray before pouring in tomato-based sauces~no more stains!
Transfer your jelly to a small plastic squeeze bottle~no more messy, sticky jars or knives! This also works well for homemade salad dressing!
Slicing meat when partially frozen makes it easier to get thin slices.
Instead of throwing away bread heels or leftover cornbread, use them to make bread crumbs or bread pudding. For use later, store them in the freezer.
Place a slice of bread in hardened brown sugar to soften it back up OR microwave for 10 seconds. Brown sugar will not harden if stored in the freezer.
Don't throw out all that leftover wine. Freeze into ice cubes for future use in casseroles and sauces.
If you have problem opening jars: Try using latex dishwashing gloves. They give a non-slip grip that makes opening jars easy!
Don't panic if your soup's too salty: Add cut raw potatoes and throw them away once they are cooked and have absorbed the salt. Your soup's saved!
Make giant ice cubes in muffin tins or plastic margarine bowls. These are perfect for using in picnic coolers or punch bowls. They look pretty and keep your drinks or food cold longer.
Cottage cheese will remain fresher longer if you store it upside down in the refrigerator. This slows the effects of oxidation.
Ice cream container sealed in a plastic bag will stop ice crystals from forming when it is in the freezer.
Regarding tomato paste, it seems a whole can of tomato paste is many times too much for some recipes. Suggestion: take a piece of waxed paper, putting it on a cookie sheet and putting teaspoonfuls of the leftover paste on the paper -- another sheet on top and freeze this. When frozen just peel them off and put them in a baggie and when you need a tsp. or tbs. of paste you have it without opening a whole can and there is no waste. OR-- put small amounts in an ice tray and then just pop them out when I need them.
Source: Kitchen Hints
Visit our new blogs:
Amoores.com
Cooked from the Heart - our new food blog
Our New Backyard - garden & photo blog
Found Not Lost - about all the things we 'find' worth talking about
 Do you have an open box of baking soda in the refrigerator because someone told you that it will absorb unpleasant odors? According to this article, Baking Soda is not very effective at eliminating odors. A more effective solution would be to put a container of activated charcoal in your refrigerator.
Note that I said 'activated charcoal' so don't go dragging the briquettes from the grill. Activated Charcoal is charcoal that has been treated with oxygen.
According to Encylopedia Britannica:
The use of special manufacturing techniques results in highly porous charcoals that have surface areas of 300-2,000 square metres per gram. These so-called active, or activated, charcoals are widely used to adsorb odorous or coloured substances from gases or liquids.
The word adsorb is important here. When a material adsorbs something, it attaches to it by chemical attraction. The huge surface area of activated charcoal gives it countless bonding sites. When certain chemicals pass next to the carbon surface, they attach to the surface and are trapped.
Where to get it: My husband uses activated charcoals in the filters for his aquariums so I know you can buy activated charcoals from pet stores. If you check at the water filters section of the hardware store, they will probably have them too.
source: How Stuff Works
Visit our new blogs:
Amoores.com
Cooked from the Heart - our new food blog
Our New Backyard - garden & photo blog
Found Not Lost - about all the things we 'find' worth talking about

People who used to churn their own butter, I'm sure were glad to see the blocks of butter, or should I say tubs of butter, when they became available at the grocery stores. Butter churns became the stuff for museums. Lately though, be it due to nostalgia or because of the movement to live more naturally, people have been going back to doing things the way they used to be done including making butter.
This article that I read this morning on The Green Dish, is an amusing recount of the author's love affair with butter and also provides instructions on how to make your own butter.
I am reminded of the time my daughter went too far making whipped cream and ended up with what I guess was butter. From the article by Melissa Breyer, here is how you make your own butter:
Make Butter:
Bring heavy cream to around 50F degrees, this took about 30 minutes out at room temperature for me.
Pour cream into the bowl of a stand mixer, cover top with shield, plastic or a dish towel. Really, do this or you will be wiping buttermilk spray from your kitchen ceiling. Whip with whisk attachment on medium-high for about five minutes, beyond the stiff peaks of whipped cream, until you can see that the fat has separated from the liquid. Alternatively, you can use a food processor or hand mixer.
Pour over a strainer into a bowl, and knead the butter to release more liquid. (This will make your hands very soft and give them a deep buttery flavor until you shower, which is kind of lovely, but can get a little gross after a while.)
When butter stops releasing liquid and feels so creamy—voila!
Save the liquid “buttermilk!” and drink or use for cooking.
Salt if you like (guilty non-local eco-sin confession: I added Himalayan pink salt).
Visit our new blogs:
Amoores.com
Cooked from the Heart - our new food blog
Our New Backyard - garden & photo blog
Found Not Lost - about all the things we 'find' worth talking about
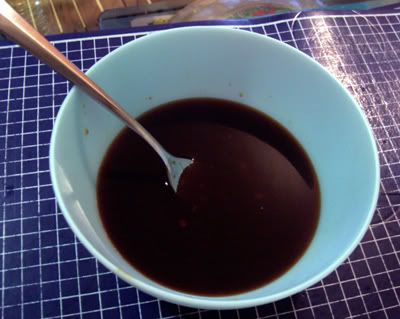
We do a lot of stir fries in our kitchen. With me working and not getting home until 6 in the evening, a quick stir fry is always a great way to get dinner on the table in no time. Making a cooking sauce was my daughter Jade's idea.
My usual way used to be to add the seasonings and sauces as I was cooking. Doing it my way was hard for the girls to follow though. It turned out, if you put all the sauces together, pre-measured into a bowl and just add it to the dish as you're stir frying, saved a lot of time and confusion.
So now, right before stirfrying, Jade puts her cooking sauce together. Like a true cook, she's protecting the proportions (or she just doesn't know) but the basic ingredients are: soy sauce, teriyaki sauce, hot sauce, minced ginger, minced garlic.
Experiment with your own cooking sauce and see what works best for you. If your sauce needs thickening, you can also add cornstarch to your cooking sauce.
Visit our new blogs:
Amoores.com
Cooked from the Heart - our new food blog
Our New Backyard - garden & photo blog
Found Not Lost - about all the things we 'find' worth talking about
I stumbled across these Top 50 Kitchen Tips and listed the top ten here. Some of them we already know, but there may be some that we didn't know before and would be helpful. So the top ten kitchen tips, mostly having to do with eggs, are:
- To check the freshness of eggs, dissolve 30ml (2 tablespoons of salt in about 1 pint of water. Place the eggs in the water. If the egg sinks then it is fresh, if it floats then it is stale.
- Store eggs in a carton in the refrigerator to prevent them from losing moisture, and also being tainted by nearby strong flavoured food.
- Store eggs in the refrigerator, as they age far slower than out of the fridge.
- Always store eggs with the pointed end down. This keeps the yolk in the centre and helps to keep the egg fresh.
- Eggs should be brought to room temperature before use.
- To prevent eggshells from cracking, add a pinch of salt to the water before boiling.
- If eggshells crack during boiling add a little vinegar to the water. This will set the white
- To prevent black rings from forming around the yolks of hard boiled eggs, drain them as soon as they are cooked. Crack the shells and run under cold water to cool quickly.
- To make soured cream: add one 5ml spoon of lemon juice to 150ml ( ¼ pint) of single cream, stir well and then leave to thicken.
- If you want to heat cream in a recipe, use double cream as it does not separate as easy as single cream or soured cream. Or you can use creme fraiche as a substitute.
Visit our new blogs:
Amoores.com
Cooked from the Heart - our new food blog
Our New Backyard - garden & photo blog
Found Not Lost - about all the things we 'find' worth talking about

What do you do when you have zucchini over running your garden? The easiest is to share. Gain some major brownie points with your neighbors by giving your bounty of zucchini away. What if your neighbors stop answering their doorbells and go the other way when you come down the street with a bagful of zucchini?
This, my friend, is the time to start putting them up for the winter. Cut them up, bag them in your desired portions (mine would be for five people) and freeze them. When I cut them up, I try to anticipate what I'm going to use them for. If I'm going to be sauteing them as a side dish, I cut them in segments about 1/8 inch thick. Some that I plan on using in stews and sauces (they're great in spaghetti sauce), I cut them up in 1/4 inch dice. I also cut some in larger pieces, 2 inch length sticks that I plan on making fried zucchinis later. When I freeze zucchini, I just cut them and freeze them. Some people blanch them first before freezing but I think this makes them too soggy so I don't. Try both ways and see which one you prefer.
If you need ways to cook up your zucchini, try these recipes:
Fried Zucchini
Pan Fried Zucchini & Vidalia Onions
Zucchini Fritters
Zucchini Basil Muffins
Ratatouille<
Visit our new blogs:
Amoores.com
Cooked from the Heart - our new food blog
Our New Backyard - garden & photo blog
Found Not Lost - about all the things we 'find' worth talking about
 Like me, you've probably been told to not salt your steaks before cooking as it dries them out. Well the Steamy Kitchen has done the research and experimentation and claims that you can turn a cheap steak into a primo steak by salting. Yes, salting!
I was intrigued enough to read the extensive post and I think it just may make sense. Read the post for yourself and let me know what you think. She even had diagrams to explain the science of why this makes sense. LOL! It sure made me hungry just looking at the photos.
Visit our new blogs:
Amoores.com
Cooked from the Heart - our new food blog
Our New Backyard - garden & photo blog
Found Not Lost - about all the things we 'find' worth talking about
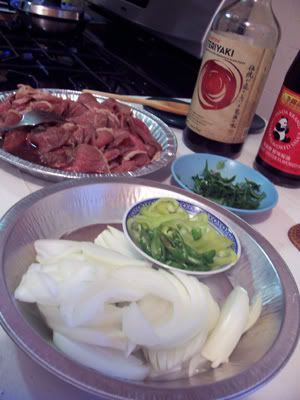 If you've watched any cooking show on TV, I'm sure you're heard the term 'mise en place' it's French and it basically means 'everything in place'. One of the secrets to successful cooking is having everything ready before you even turn on the stove or mix anything together. If you notice in all the cooking shows, they have all their ingredients already portioned out, chopped and in those cute little bowls. It's not just for show, there is actually a very practical purpose to all the cuteness.
Have you ever cooked something and put sugar instead of salt or vice versa? Omitted an ingredient? Cooked them in the the wrong order? Burned something because you were busy chopping another ingredient? Or got halfway to making a recipe and discover that you didn't have one crucial ingredient?
Well you can avoid all those mishaps simply by having all your ingredients ready before you even start cooking. If you hate cleaning up and washing dishes as much as I do, you don't have to dirty up a ton of cute little bowls. I re-use the tin pie pans that store bought pies come in to put or group some of my ingredients, for instance. I saw another tip where they laid everything out on wax paper that way when you're done you just crumple up the paper and throw it out. That's not always practical when you have limited counter space like I do though. For sauces and packaged ingredients, I don't bother measuring them out into little bowls. I just pull all the ingredients from the pantry and put them on the counter next to the stove so I won't forget to add them.
Having everything in place and ready to go is especially important when you're stir frying since the cooking time is so fast that you don't have time to be looking for and preparing ingredients once the wok gets cooking.
Do you have any tips for 'mise en place'? How do you get things ready for cooking? Care to share?
Visit our new blogs:
Amoores.com
Cooked from the Heart - our new food blog
Our New Backyard - garden & photo blog
Found Not Lost - about all the things we 'find' worth talking about
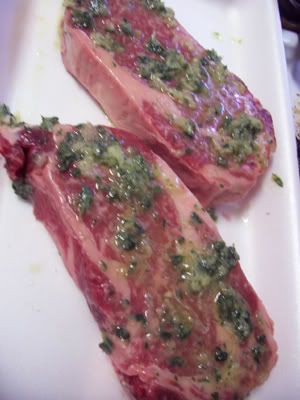
 Oh it's grilling time again, and if you're blessed with lots of basil from your garden, it's probably pesto time also. We have been blessed with pesto for the second year in a row but as much as I love it, we just can't eat enough pasta and pesto to use it up. So we've been giving it away and using it up for other dishes like this grilled chicken marinated in pesto.
This is a very simple recipe. Just marinade the chicken pieces in pesto sauce for 30 minutes to overnight and grill.
If you missed the pesto sauce recipe I use the first time, here it is again.
2 Cloves of fresh garlic
3 cups of fresh basil leaves, stems removed
1/2 cup of pine nuts
1/2 cup of grated parmesan cheese
1/2 cup of olive oil
In a blender, blend the above ingredients together until smooth. Done!
COOKING TIP:
From experience, I found that this sauce will last in the refrigerator for two to three weeks stored in an airtight container. You can also freeze this sauce and use it to flavor anything that requires a basil flavor. You can freeze small amounts for sauces in an ice cube tray then after they harden, transfer the cubes in a ziplocked freezer bag. It is best to freeze them in portions that you will need so you won't have to defrost the bags before using.
If you are making a batch specifically for freezing, you can omit the parmesan cheese and pinenuts and add those fresh later when you are ready to use the basil.
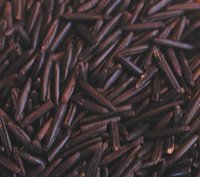 Some commenters to the last post on Baked Chicken with Wild Rice asked what wild rice is, so here is some information about this grain.
According to this source, wild rice (Zizania Palustis L)is of the grass family and is native to North America. It is known by many names: indian rice (by early English explorers), folle avoine (by the French), Canadian rice, squaw rice, water oats, blackbird oats, and marsh oats. Wild rice has high protein and carbohydrate content and would be perfect for someone in need of fiber or quality carbs in their diet. I like it because of the nutty flavor and the different texture from the usual white rice.
For additional information, click on the photo above or visit http://www.wildrice.org/.
If you would like to try another wild rice recipe tested In Our Kitchen, try our Wild Rice and Mushrooms recipe that we had as a side dish for Thanksgiving.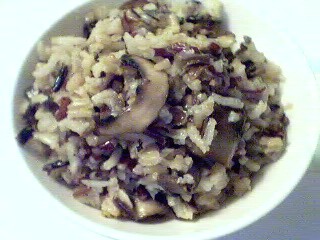
With summer's rising humidity, I'm sure I am not the only one who has encountered this problem. Upon opening this not too airtight container, I found this block of brown sugar that is so hard, I probably would have had to have a chisel to break it up. Luckily, I remembered this tip from one of the many cookbooks and/or magazines I've come across (sorry I can't remember which one now). To 'thaw' it out, simply stick it in the microwave for 10 to 15 seconds and it is back to its soft stage again! No need to break out the chisel.


