When it comes to bread pudding, I always remember my mom's. I think she makes one of the best bread puddings, but I have never been able to duplicate it. She doesn't have a recipe, she says she just puts enough milk, eggs and sugar to moisten whatever leftover breads she has and pops it in the oven. Sounds simple enough, and I have tried playing with the 'blind method' and have gotten pretty good results, but still I come up short of mom's bread pudding. Maybe it is just because it is Mom's and it's one of those things that you remember from childhood. So I decided, especially since I started this blog, to find the right bread pudding recipe for me and my girls. Well, mostly Asi. She is my bread pudding eating buddy. The last batch I cooked following Reid's recipe, we basically ate it all, just the two of us.
The frugal ilokana in me just can't help but try to use up every bit of left over bread, including the ends. I have never been so glad for the ducks at Duke Garden; so now I don't have to save the ends for us, but for them. We go and feed the ducks during our walks sometimes, especially during the colder months when they don't get as much food. Reid's recipe called for Portuguese sweetbread, and Claudine, who also tried out the recipe used pan de leche for her bread pudding. Well, back to el cheapo me who insists on using up 'old' bread stored in the freezer. Here is the first version:
BREAD PUDDING I
I used days old french bread for this one. When it got too old and dried for anyone to eat but before it got moldy, I made this. First I sliced the bread.
To this I added:
4 cups Milk
3 eggs, slightly beaten
3/4 cup sugar
1/4 teaspoon salt
1 teaspoon vanilla
1/2 teaspoon cinnamon
Mix all the ingredients and pour over the bread slices. Let stand for 15 to 30 minutes. Pour into a buttered dish and bake at 325 degrees for 50-60 minutes.
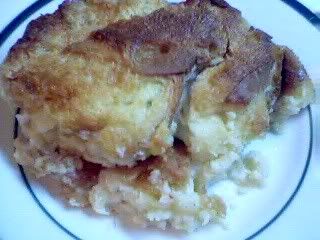
This one baked up beautifully, then slowly falls. It was crusty on the outside, and soft inside, but still not quite the flavor or texture I was looking for.
So on to the next version, which is based on Reid's and Claudine's take on bread pudding.
BREAD PUDDING II
For this version, I used 4 large frozen pan de sal, cut into 1 inch chunks.
2 cups evaporated milk
4 eggs
6 tablespoons butter
3/4 cup sugar
1 teaspoon vanilla extract
1/4 teaspoon nutmeg
1/2 teaspoon cinnamon
1/2 cup raisins
1/2 cup toasted pecans
Place bread chunks in a baking dish (I did not butter the dish this time) and sprinkle with raisins and pecans. In a mixing bowl, cream the butter and sugar until smooth. Mix in eggs one at a time, then add the milk and seasonings. Pour the mixture over the bread and let sit for 30 minutes. Bake at 350 degrees for 40 minutes and let it rest, uncovered for 30 minutes before serving. 
Reid said to bake it covered, but I must have missed that part when I was reading his instructions, so I baked this UNcovered. It turned out just the way I like it, a bit crusty on top. The addition of butter and use of evaporated milk instead of whole milk made the dish so much richer, and oh so good! Some of the bread on top were drier than the bottom though, so I'm thinking I didn't put enough liquid. Next time, I will probably double the proportions and see how that works out. The raisins and nuts also added extra decadence to the pudding. Yummy!
Thanks Reid and Claudine!
You can tell by the number of soup posts lately that the weather has gotten cold. This is a thick and hearty meal that also provides a lot of warmth within. We had this with corn casserole, and it was wonderful! As usual, I had to make two pots, one spicy and the other not spicy for the kids. Here is the spicy version. For the kid's version I merely omitted the additional jalapeno peppers.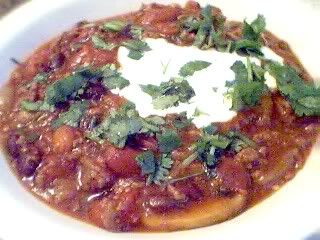
2 lbs. coarsely ground beef chuck
1 head garlic, chopped
2 large onions, chopped
1 lb. mushrooms, sliced
1 20 oz. can of diced tomatoes
1 20 oz. can of tomato sauce
1 8 oz. can of tomato paste
1 15 oz. can of red kidney beans
1 15 oz. can of pinto beans
1 15 oz. can of black beans
3-5 jalapeno pepper, seeded and diced
1 bunch cilantro, chopped
1 tsp. oregano
1 tsp. cumin
1 tsp. chili powder
2 bay leaves
pinch of cinnamon
Salt & pepper to taste
Heat a large pot and brown the ground beef. Add the garlic and onions and sautee until fragrant. When the onions are translucent, add the mushrooms and sautee until browned on the edges. Season with oregano, cumin and chili powder then add the diced tomatoes, tomato paste, and beans including the liquid. Add the bay leaves. Simmer for 1 to 1 1/2 hour stirring occationally until thick. Add a pinch of cinnamon, salt, and pepper. At this point, I take some of the chili out for the kids' mild version. For the spicy pot, add the diced jalapeno peppers and half of the chopped cilantro. Simmer for another 20 minutes, stirring occationally.
We like our bowls served with a dollop of sour cream and a sprinkling of chopped cilantro.
The second dish I made with the chicken dumplings is soup, with plenty of vegetables. The weather has gotten cold again, another reason why I didn't feel like going anywhere today, and soup seemed just right for a light but warm supper.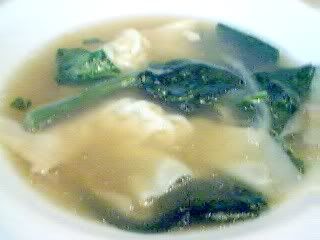
8-10 cups chicken broth
1 onion, sliced
3 cloves garlic, minced
5-6 round slices of fresh ginger root
1/2 pound of green beans, stringed and cut in half
1 pound of young spinach leaves
15 chicken wonton dumplings
Salt & Pepper to taste
1 tablespoon Oil
Heat the oil in a large pot and sautee the garlic and ginger until fragrant. Add the onions and cook until translucent. Add the chicken broth and bring to a boil. Let it cook for 10 minutes, add the green beans and dumplings and cook until beans are tender, about 10 minutes. Add the spinach leaves and adjust the seasoning. Stir the spinach into the soup just until they are wilted and the color changes to bright green, then turn off the heat.
 Today was a lazy day, we didn't really do much but play on the computer and decorate our blogs. I didn't even feel like cooking really, but girls do have to eat, so I decided to fix something light for dinner tonight. I decided to make chicken dumpling and make it two ways. The first is potstickers.
Read the rest...
This was tonight's dessert, which was a collaboration with The Clone. She was bored and feeling neglected this afternoon, so to cheer her up, we decided to make cake.
2 cups Light brown sugar, firmly packed
1 teaspoon salt
2 teaspoons Cinnamon
1 1/2 cups Cooking Oil
4 eggs
3 cups grated carrots
2 cups all-purpose flour
2 teaspoons baking soda
1/2 cup chopped nuts
In a large mixing bowl, combine the sugar, salt, eggs, cinnamon, oil and carrots. Blend together with an electric mixer (blending by hand also works, I've done it when I don't feel like taking the beater out). Gradually add the flour, baking soda, and nuts (the Clone decided she didn't want nuts in the cake, but rather on top of the cake so we omitted this step this time). Mix well. Pour into greased and floured 9 inch round pans (you can use two or three, depending on how many layers you want). Bake in a pre-heated 350 degree oven for 45 minutes or until a toothpick inserted in center of cake comes out clean. Since I used 3 round pans and the layers are thinner, I only had to bake for 35 minutes. Let the cakes rest for ten minutes after removing from the oven then turn them out onto racks to cool.
CREAM CHEESE FROSTING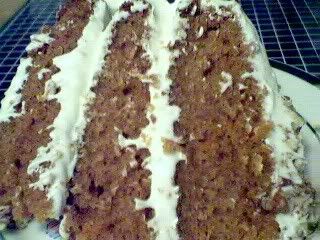
Jade made the frosting. She used:
1 stick (1/2 cup) Butter
2 bars Cream Cheese
approximately 2 cups of Powdered (confectioners) Sugar
Beat the butter and cream cheese until creamy. Gradually add confectioners sugar starting with 1 cup and adding a little bit more at a time until desired sweetness is achieved.
Frost cake. The Clone decorated the top with toasted and chopped Pecans.
I saw this recipe on Sassy's Blog and thought it may be a good thing to try. Cooking chicken as often as we do, the same recipes over and over again get tiresome, so it's always great to discover a new way of treating the same meat.
I had to make minor adjustments to the recipe though, since I didn't have liquid seasoning and didn't have time to go out to the grocery store.
1 whole chicken
1/4 cup Worcestershire Sauce
1/4 cup soy sauce
1 head of garlic, chopped
1 large onion, sliced
3 cups tomatoes (I used frozen quartered tomatoes from my summer garden)
1 20-oz can of pineapple chunks (a little more than what's called for in Sassy's recipe, but I didn't want to bother about putting the other half of pineapples in the refrigerator. Knowing us, it will still be there growing something in a month or so, so better to use it now)
1 tablespoon of rice vinegar
4 tablespoons of sugar
Red pepper flakes
4 tablespoons of butter
Salt to taste
I followed Sassy's instructions and marinated the chicken in half the garlic, 1/4 cup of Worcestershire sauce, and 1/4 cup of soy. Then put the mixture over medium high heat while I prepared the rest of the ingredients.
In a separate pan, I sauteed the garlic, onions and tomatoes in butter. I then added the sauteed vegetables and the rest of the ingredients to the chicken and simmered them until the chicken is tender, about 40 minutes. Adjust the seasonings and serve.
It was delicious! I couldn't get The Clone to try it though, she thought I was serving her the pig's feet I cooked last night :) She didn't trust me even when I swore it was chicken, so she just ate rice and nothing else. Actually, I think she was saving room for dessert.
I have been tracking Manang's posts on the unwanted parts of pork, and she got me hankering for something sinful, and I have been eyeing these pig's feet at the grocery store for some time but I wasn't sure how to cook them. So I too referred to Sassy's recipe for paksiw na pata.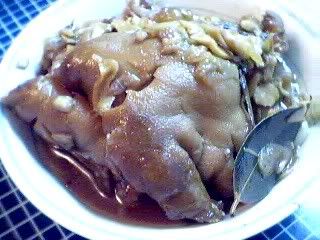
I used dried lily buds like Manang since I don't have bulaklak ng saging as Sassy's recipe called for. As usual, I was the only one who ate this. Hubby tasted the sauce and liked it, but he said the rest of the stuff was too fatty. He put the sauce over his rice. Asi tasted it and liked it too. Jade and the Clone won't even taste it. Oh well, more for me. I had to put half in of it in the freezer though, so I won't overdo it. Still gotta watch the fats, you know :).
Here is one more, and promised to be the last mention of turkey. For a while anyway. I had made turkey broth and froze a quart of it for future use. The opportunity to use it came up when The Clone asked for soup this weekend. She loves noodles, and soup, but rather than giving her her usual dose of Ramen noodles I decided to give her something a little healthier.
Very simple to make, just add noodles to the boiling broth. The broth was so well flavored that I didn't have to add any additional flavoring except for a spoonful of sinigang mix (tamarind flavor) to add a bit of sourness. When the noodles are tender, add a handful of spinach, and cook just until the leaves wilt and change colors to bright green.
Jade and I added a dash of chili paste in our bowls, and it was delicious!
So what comes after a turkey feast but the inevitable turkey soup? Here is a very simple version, and it got that turkey carcass out of the fridge.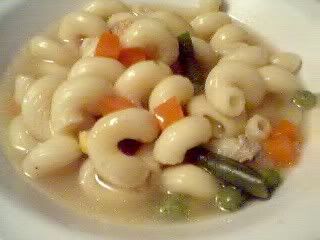
After most of the turkey meat has been devoured and you are left with just the skin and bones, don't throw it away. Throw it in a stockpot instead, and squeeze the last remaining flavor from it by adding about a gallon and a half of water and boiling it for oh, about an hour. Let it cool, remove the bones and discard. Then strain the remaining broth to remove all solid matters from it. Now you have turkey broth that you can either freeze and use later, or make turkey soup with. To make soup, just add any vegetables you like, I added a couple of cupfuls of frozen mixed vegetables, and any pasta you have on hand. I used fucilli in this case. You can also throw in whatever turkey meat you have left (I didn't have much as you can see), and in ten minutes, or when the pasta is tender the way you want it, soup is on!
Santos of the Scent of Green Banana blog has been wandering in L.A. at Third and Fairfax and she has been so making me hungry! One of the things she reminded me of? La Brea bread! Hhmmm, this goes so well with soup.

We were a bit leery about having turkey again, and had actually considered having fish or quail, but one, I couldn't find quail, and The Clone does not eat fish, and I would have had to fix another meat dish for her. So, back to turkey we were. I wanted to try something new, and since I was off on Wednesday anyway, I thought I would try brining the turkey. The result was wonderful! I think this is the best turkey we've ever had, it was moist, and most of all the meat was flavored all the way through. Here is the brine I used, combined from several recipes I used for reference:
1 1/2 cup Kosher salt (don't use ordinary table salt)
1 1/2 cup Brown sugar
10 whole cloves
3 teaspoons peppercorns
2 oranges, quartered
3 teaspoons dried Thyme
3 teaspoons dried Basil
1 1/2 gallons of water
Combine all ingredients in a stock pot, bring mixture to a boil, lower heat and simmer for 15-20 minutes. Allow brine to cool completely.
Rinse turkey under cool running water, inside and out (remove giblets from cavity). Pat turkey dry with paper towels, then immerse turkey in cooled brine. Turkey should be completely submerged in liquid. My pot wasnt big enough, so the tips of the legs were sticking out a bit, but it still turned out ok.
Cover the pot and refrierate for 8-10 hours or up to 24 hours. Remove turkey, rinse, pat dry, and roast as usual.
The girls aren't too crazy about stuffing, and I still had a bit of stuffing in the freezer from our trial run, so we had this instead. It was pretty good!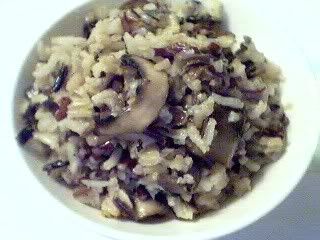
2 1/2 cups of Wild Rice Blend (mixture of American Basmati, Wild Rice, Brown Rice, and Red Rice)
6 oz. Crimini mushrooms, sliced
1/2 onion, chopped
3 cloves garlic, minced
3 tablespoons olive oil
3 cups chicken broth
Salt and Pepper to taste
Heat the olive oil in a pan and sautee the onions and garlic until fragrant. Add the musrooms and cook until they are just starting to brown. Add the rice blend and stir to coat rice with oil. Add the chicken broth and cook at medium heat and cover. Cook for 10 minutes, then lower heat to low and simmer for 15 minutes or until you are ready to serve.
This is a very easy vegetable dish, and it is ideal for children. At least, my girls like beans and carrots. I had made the greens a little spicier this time, so I had to make a milder vegetable.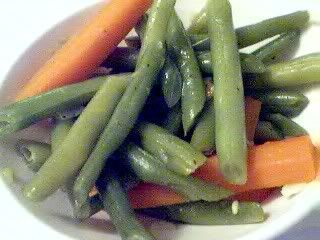
1 lb. Green Beans, cut into half length
2 large carrots, cut up
2 cloves garlic
1/2 onion
Olive Oil
Salt and Pepper to taste
1/4 cup water
Heat olive oil in a pan and sautee garlic and onion. When onions are translucent, add the green beans and carrots and stir. Add water, salt and pepper and simmer until the vegetables are tender.
The Clone loves corn, and this recipe is even better when freshly shucked corn is available. For this version though, I used canned corn since the fresh are nowhere to be found anymore.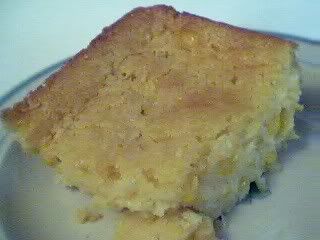
1 (15 1/4 oz.) can whole kernel corn, drained
1 (14 3/4 oz.) can cream-style corn
1 (8 oz) package corn muffin mix (recommended: Jiffy)
1 cup sour cream
1/2 cup (1 stick) butter, melted
Preheat oven to 350 degrees F.
In a large bowl stir together all the ingredients and pour into a greased casserole dish. I used a square 9 x 9 inch glass dish. Bake for 45-55 minutes, or until golden brown.
The original recipe calls for cheese to be melted on top, but we are not too keen on cheesy toppings, and I was afraid it would overpower the taste of the corn, so I left it out.
Sweet potato pie is a Southern staple during Thanksgiving. My husband's family is not too much into pumpkin pies, but sweet potato pies are a must. It's just not Thanksgiving without them. My mother-in-law, Dot, made the best sweet potato pie, not too sweet, not overly spiced. Like most good cooks though, she didn't have a recipe; she just cooked by feel. When it felt right, then it was time to put it in the oven. This is one of of her recipes that I cajoled her into sharing with me. For some reason that I find strange, many Southern cooks don't like to share their recipes. So one occasion when she was making these, I watched her and approximated the proportions. She was so funny, because once in a while I'd catch her shield the bowl and throw something in there. I'd say, "Now what did you just put in there, Mom?" and she would say nonchanlantly, "Oh, nothing, I was just tasting it" and smile. She says that is her secret, she tastes as she goes along, and stops adding ingredients when she feels and tastes it to be right. This recipe comes very close to her pies, but I think there is just something special that moms and grandmas add to their cooking that makes it special and reminds you just of them. I hope my daughters will someday look back and think the same way about the foods we've shared.
2 Deep Dish Pie Crusts (I used the ready-made, store-bought stuff, but if you want to make your own from scratch, Manang Kusinera has a very good recipe and step by step method of making pie crust on her blog.
4 Large sweet potatoes
4 eggs, beaten
1 1/2 cups sugar
1 cup milk
1/2 cup or 1 stick of butter, softened not melted
1/4 teaspoon salt
2 teaspoon apple pie spice
1 tablespoon vanilla
4 tablespoons flour
Bake the sweet potatoes for one hour in a 350 degrees F oven. You can also microwave or boil them, I just prefer baking them. Just make sure you leave them whole, don't peel and slice them yet as they would absorb too much liquid. Cool after baking, and peel, then mash.
In a large mixing bowl, mix all the ingredients until they are well blended. Momma Dot used to mix hers by hand, but she says that she discovered, when you mix with an electric mixer, the beaters pick up the stringy strands and give a much smoother pie. Just don't scrape the beaters after mixing, although it may seem the frugal thing to do. You'll see what I mean when you clean the beaters. Divide the batter into the crusts. At this point, you can freeze the pies to bake at a later time.
Bake at 400 degrees F for 10 minutes, then lower the temperature to 350 degrees and bake for an additional 40-50 minutes. Cool before serving.
Here is my version of the Pumpkin Flan, thanks to Drstel for the idea. If you want to see step by step instructions, go here. For the final product and original recipe, go here.
I didn't have a 2 quart dish as the recipe recommended, I had a 1 1/2 pint round oven safe dish, so I used that but I ended up having some left over batter. So I put it in another, smaller dish, and that is what I unmolded and photographed. Plus, we got to sample before dinner. This is simply delicious, and very easy to make.
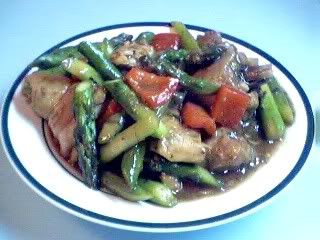
I actually wanted to make chicken stirfry with fermented black beans, like the one CeliaK made, but when I went to go cook, I realized I didn't have any black beans, so I cooked it anyway and just pretended like it had 'tausi'. Well, another improvisation, but it still worked.
1 whole chicken, cut up chinese style into bite sized pieces
1 onion sliced
5 cloves of garlic, minced
1 teaspoon fresh ginger, minced
1 lb. fresh asparagus, trimmed and cut into 1 inch length
1 red bell pepper, cut into 1 inch squares
2 tablespoons Oyster Sauce
1 tablespoon Hoisin Sauce
1 cup water
2 tablespoons oil
1 teaspoon of cornstarch dissolved in about 1/8 cup of water
Heat oil in wok or large skillet. Add garlic and ginger and stirfry until fragrant, then add onions and stirfry for another minute. Add chicken pieces and stirfry for a few minutes more. Add 1 cup of water, and cover to simmer until tender, about 30 minutes. When the chicken is tender, the liquid will probably have reduced to about 1/4 of a cup. At this point, add the oyster sauce and hoisin sauce and stir. Then add the asparagus and red bell peppers and stir fry for a couple of minutes until they are cooked through but not soft. They will render some liquid, you can thicken any liquid left in the pan with the cornstarch mixture. Adjust the seasonings to your taste, and serve.
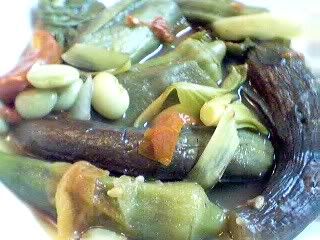 This is my lola's favorite dish. Not a week goes by that she doesn't cook 'dinengdeng', a typical ilokano dish, at least once.
My dinengdeng recipe.
Sassy posted several versions of her Mango Royale on her site that I have been meaning to try but I either did not have the time or the correct ingredients on hand. With the recent disappointing election results though, we have been on a sweet binge at our house to offset the bitterness of another four years with Dumbya. Drstel who has been also feeling down posted several delectations on her food blog. Thanks to PurpleGirl who researched the recipe to adapt to ingredients available in the U.S., the work got even easier for me.
We couldn't make up our mind whether to use peaches or mandarin oranges, so we decided to use both. It was delicious! Here is our version, with some minor changes.
1 18 oz. can of Mandarin Oranges
1 18 oz. can of Sliced Peaches
1 Graham Cracker Crust (pre-made)
1 Pint of Heavy Whipping Cream
1 8 oz. bar of Cream Cheese
1 can of Condensed Milk
Mix the cream cheese and condensed milk until well blended. Scrape the sides and bottom of the bowl to make sure all the cream cheese is blended and incorporated, add half of the whipping cream and mix well. In another bowl, whip the remaining half of whipping cream until it forms stiff peaks. Slowly fold in the whipped cream to the cream cheese mixture and pour into the graham cracker crust. Put the mixture in the refrigerator for 10 minutes to set. In the meantime, drain the canned fruits to remove some of the moisture. Arrange the fruits on top of the pie and return to the refrigerator to set.
The fruit arranging was Jade's job. We couldn't wait long enough to allow the pie to fully set though, so when we cut the first piece below, it wasn't fully set yet, but it was royally divine!
I have tried the no-bake cheesecake recipes before using Jell-O flavorings, but the result was not as good, and it had that "instant jello" after taste. This version is so much better, and the best part? No baking!
I saw this recipe for bulgogi which is Korean barbeque on PurpleGirl's blog sometime ago and I've been wanting to try it for sometime, but haven't found the right cut of meat until recently. However, by this time, the weather has turned cool, and it just is not conducive to cooking outside anymore. Plus, as usual, I didn't have a whole lot of time to get dinner on the table, so this is my version of the Koreal style barbecue, stovetop. I used a pressure cooker to hasten the cooking time even more. 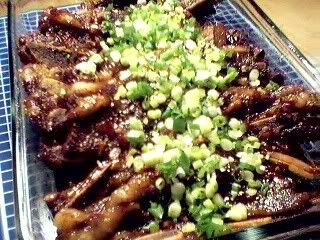
You will need, 2 pounds of beef short ribs, cut for kalbi which is beef short rib sliced across the ribs, about a fourth of an inch thick. A bit unusual to find in the regular grocery store, but I lucked out and found a pack. First, I rinsed the slices to remove any grit from the sawing of the bones, and spread the slices on a baking sheet. Take 4 tablespoons of brown sugar and sprinkle or rub onto the slices and marinade for 10 minutes while getting the rest of the ingredients ready. Mix in a small bowl:
4 garlic cloves crushed and minced
4 tablespoons soy sauce
2 tablespoons sesame oil
1/4 cup rice vinegar
1/2 teaspoon red pepper flakes
1 cup water
Layer the ribs in the pressure cooker and pour the ingredients above over the meat. Seal, and pressure cook for 35 minutes. After the meat is tender but not falling apart, lay them on an ovenproof dish and put in a 400 degree F oven to caramelize, about 15 to 20 minutes. In the meantime, take the remaining liquid in the pressure cooker and cook additionally until it is reduced to half and has thickened. Remove the pan from the oven and pour the sauce over, and sprinkle with chopped green onions. Serve over steamed rice.
Jade made this soup last Sunday, Halloween. It was so good after being out in the cold night air. She said she saw it on the food channel one day, and it looked interesting to her so she wanted to try making it. I was so busy last Sunday that I didn't really get a chance to help her other than yelling to her where things are in the kitchen. We had to leave before she could finish the soup, so she left instructions for her dad to drizzle the eggs and keep the soup warm.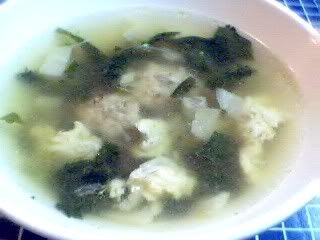
MEATBALLS:
1 onion grated or finely chopped
1/3 cup chopped fresh Italian parsley
1 lg. Egg
1 teaspoon minced garlic
1 teaspoon salt
1 slice fresh white bread, crust trimmed and torn into small pieces
1/2 cup grated Parmesan cheese
1/2 pound of Ground Beef
1/2 pound of Ground Pork
Freshly ground black pepper
SOUP:
12 Cups low-sodium chicken broth
1 pound curly endive, coarsely chopped or escarole would be a good substitute
(she used spinach since I couldn't find curly endive or escarole in the market)
2 lg. Eggs
2 tablespoons of freshly grated Parmesan cheese, plus extra for garnish
Salt and freshly ground black pepper
To make meatballs, stir all the ingredients together. Shape the mixture into 1 inch diameter balls and place on a baking sheet.
In a stock pot, bring the broth to a boil over medium heat. Add the meatballs and spinach (or curly endive if you have it) and simmer until they are cooked through, about 8-10 minutes. Whisk the eggs and Parmesan cheese in a medium bowl to blend. Stir the soup in a circular motion and gradually drizzle the egg mixture into the moving broth, stirring gently with a fork to form thin strands of egg (dad was not too successful doing this, they came out in lumps, but the flavor was still good).
For the first time, our local grocery store actually carried some local NC shrimps with the heads on at a reasonable price so I thought I would try out the drunken shrimp recipe that I have been drooling at from Sassy's and TingAling's previous posts. However, I didn't get around to cooking right away, and before you know it, hubs and I had finished the wine I was going to use. Ah well, I had to come up with another recipe. I always love things cooked in coconut milk, and that we didn't drink, so I decided to use that instead. I also still have an abundance of kamote tops so I threw in a handful of those too, and it actually came out pretty well.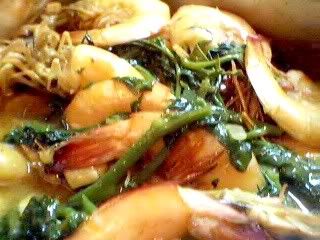
2 lbs. of shrimps with shell and heads on
2 handfuls of kamote tops (sweet potato tops)
2 tablespoons of oil
4 cloves of garlic, minced
1 onion, sliced
1 inch piece of ginger, peeled and sliced
1 cup of coconut milk
1 tablespoon of oyster sauce
salt & pepper to taste
Heat oil in a skillet and saute the garlic and ginger until they start to brown at the edges then add the sliced onions and saute for a few minutes. Add the coconut milk and let it come to a boil. When it is boiling, add the shrimp, oyster sauce and kamote tops and cook for a few minutes until the shrimp changes to the reddish color and the kamote is tender. Taste and adjust the seasonings, and serve.

Here's another simple recipe, great for nights when you only have 30 minutes to get dinner on the table. While the rice is cooking, get these ready:
3-4 Boneless, skinless chicken breasts cut up for stirfry
1 tablespoon light soy sauce
1 tablespoon rice vinegar
2 tablespoons of canola oil
3 cloves of garlic, minced
1 onion, sliced
1 teaspoon minced fresh ginger
1 tablespoon of Oyster Sauce
1 lb. of chinese snow peas, ends removed
Salt & Pepper to taste
1 teaspoon cornstarch dissolved in 1/4/c water
In a bowl, mix the chicken pieces with 1 tablespoon of light soy sauce and 1 tablespoon of rice vinegar. Let marinate while you fix the rest of the ingredients. Heat your wok or pot to high heat, or until the oil is just at the smoking point. Add the ginger and garlic and sautee until fragrant. Add the onions, and stir, then add the chicken mixture, including the marinade. Stir fry until the chicken changes to a whitish color. Add the oyster sauce and snow peas, and stir just until the snow peas change to a bright green color. Add salt and pepper to taste and the cornstarch mixture to thicken any liquid rendered, and you're done! Dinner in 30 minutes.
Turkey has been in the food blogging air this week as TingAling did her own trial run, and Drstel reminisced about Thanksgiving dinner past. It just so happened that the same day that TingAling posted her turkey dinner, I came home from the store with a turkey. It was on sale. My husband, who just loves turkey and can eat it at least once a month, has been asking for turkey and I have been trying to put his craving off until Thanksgiving. But since the turkey was on sale, I decided to indulge his craving.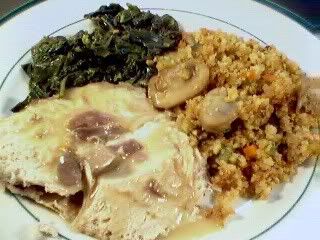
It is also the baby Clone's birthday tomorrow, so this was a sort of pre-birthday dinner.
First, the turkey: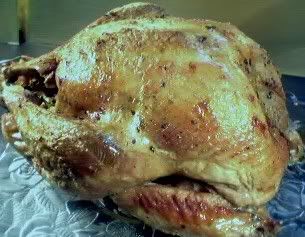
1 12 lb. Turkey
4 cloves of Garlic (peeled, leave whole)
1 Onion, quartered
1 Stalk of celery, cut into 1 inch lengths
1 Carrot, peeled and cut into 1 inch lengths
2-3 teaspoons of Salt, according to taste
1 teaspoon black Pepper
2 teaspoons dried Basil
1 teaspoon fennel seeds
1/2 teaspoon red pepper flakes
Wash turkey thoroughly and pat dry. In a small bowl, mix the salt, pepper and spices. Rub the turkey inside and out with the seasonings, and stuff the cavity with the garlic, onions, celery and carrots. Instead of the vegetables, some people would at this point stuff the turkey with stuffing, but I have gotten a bit paranoid about getting the stuffing up to a safe temperature, so I just cook the stuffing separately, out of the turkey. Bake the turkey at 325 degrees F for about 3 hours, basting occationally with the drippings. Let the turkey rest for at least 10 minutes before carving.
After you have washed your turkey, hopefully you found the bag of its gizard, liver, and neck usually tucked in the neck cavity of the turkey. The first time I ever cooked turkey was when my husband and I just got married and I was trying to cook something that he liked. I looked through my cookbooks, consulted my mom, and finally I was ready to attempt this turkey roasting fete. Well, they all said to remove the bag containing the gizard and liver. However, when I was washing the turkey, I didn't find this said bag inside the cavity, where I expected it to be, just like a chicken. So I asked my husband, who I thought had more experience with turkey, how come there was no bag inside? He said, maybe they forgot to put it in, so we both said, oh well, and went on. I fixed turkey and all the trimmings, and we had invited my sister, his brother and a couple of friend over for dinner. It was a huge success, everyone thought everything was perfect. That is, until it was time for seconds. My brother in law wanted seconds, so he goes to carve more turkey. Lo and behold, when he cut into the upper portion of the breast, he goes, "What is this?" and proceeded to pull out a plastic bag from the turkey!!! Needless to say, we all lost our appetite at this point. There was the plastic bag with the gizzard, liver, and turkey neck.
So if you find this darn bag before you roast the whole turkey, do take it out and wash the contents and place them in a separate pot to boil as this is what you will need if you are to make giblet gravy. Another southern thing.
To make gravy you will need:
Giblet and liver, boiled until tender and chopped up. Reserve the boiling liquid.
2 cloves of garlic
1/2 onion
1/2 cup of flour
1/4 cup of butter
2 cups of the reserved boiling liquid plus any drippings from the roasted turkey
Melt the butter in a saucepan and sautee the onions and garlic until the onions are tender or translucent. Add the flour and cook until it has turned into a light amber color. Add the broth and simmer until the gravy has thickened. If you use the drippings from the turkey, you usually don't have to add anymore salt as the flavor from the turkey should be enough to season your gravy. However, taste and adjust the seasoning to your liking.
We can't have turkey without stuffing, so here is my version this time. I say this time because this always changes depending on what mood I am in and what ingredients are available. Today, I used mushrooms, but I have been known to throw in some oysters, nuts, apples, you name it.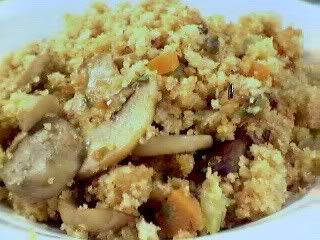
Click here for the recipe for this Cornbread and Mushroom Stuffing.
While the turkey is roasting, I cooked the Greens. Greens is a must for us, when we have turkey, they just go so well together. Greens is a typical southern dish, and most would not dream of mixing the type of greens together, but I find the flavor of mixed greens quite good so I usually mix collards, mustard, and turnip greens together. They didn't have turnip greens at the market this week though, so for this version I only used collards and turnip greens.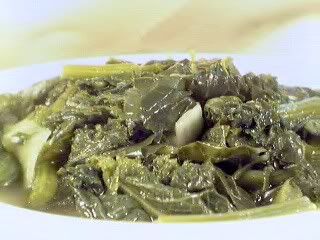
The most important thing about cooking greens is washing them. They tend to have a bit of dirt and sand still stuck to them, so if you don't like gritty greens, wash them thoroughly. I usually put them in a basin full of water and slosh them around to loosen the dirt, then repeat until there is no sediment at the bottom of the basin. Greens can be cooked just by themselves, of course, but this being the south, it wouldn't be quite right if it didn't have a piece of smoked pork in it. Most people use smoked ham hocks, but I prefer to use pieces of Virginia Country Ham. At most groceries here, they also sell smoked turkey which is what some people use especially if they are not into pork. To start, boil the smoked meat in about 4 cups of water in a large pot. Boil the meat while you are preparing the greens to give it a head start in getting tender and flavoring the broth. Many southern cooks don't add garlic and onions to their greens, but I do. So I put two cloves of garlic and 1/2 of a chopped onion to the boiling water. After washing the greens, it's time to trim them. For the mustard greens, all you have to do is to cut the ends off (stalk end) and cut up the leaves in one inch strips. For the collard greens, I take off the stalk completely and just keep the leafy portion, also cut into one inch strips. Add the greens to the pot, and simmer until tender. When the greens are tender, (after about 30 minutes) adjust the saltiness by adding more salt if needed. Add about a teaspoon of red pepper flakes, and two tablespoons of cider vinegar and simmer for an additional 10 minutes. Stir, and check the seasonings again and adjust as necessary.
For dessert, here is another traditional southern fare. I used the recipe on printed on the box of Nabisco 'Nilla Wafer Cookies.
35-45 "Nilla" Wafers
6-5 ripe bananas, sliced
3/4 cup sugar, divided
1/3 cup all purpose flour
Dash of salt
4 eggs, separated
2 cups milk
1/2 teaspoon vanilla extract
CUSTARD: Mix 1/2 cup sugar, flour, and salt in top of double boiler. Blend in 4 egg yolks and milk. Cook, uncovered, over boiling water stirring constantly until thickened. Remove from heat and stir in vanilla.
MERINGUE: In another bowl, beat egg whites until stiff but not dry; gradually add remaining 1/4 cup of sugar and beat unti stiff peaks form.
ASSEMBLY: To assemble, spread a small amount of the pudding on the bottom of a glass dish; cover with a layer of wafers ad a layer of sliced bananas. Pour 1/3 of custard over the bananas. Continue to layer wafers, bananas and custard to make three layers of each, ending with custard. Spoon the meringue on top of the custard spreading to cover the entire surface and sealing well to the edges.
BAKE: Bake at 350 degrees F for 10-12 minutes or until meringue is lightly browned. Cool slightly or refrigerate, and serve.
For us, I doubled the recipe as the kids and the hubby always like to have leftovers. If I make one batch, it is only good for one sitting.
In honor of the Clone (my youngest daughter) whose birthday is tomorrow and who loves anything with pasta, this is for you, baby! We actually had this last week, as we have to have something akin to spaghetti at least once a week for the clone, but I just haven't had time to post much since it has been a hectic week for me at work. This is you basic tomato sauce, only with italian sausage instead of plain ground meat.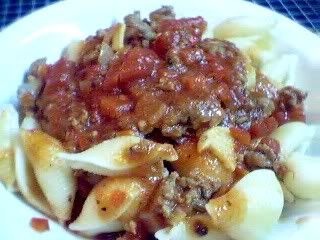
My basic spaghetti sauce recipe is here. I took the sausage out of the casing, since for some reason the Clone will not eat sliced sausages in her sauce. She like it this way though.
One of the simplest ways to cook eggplants is to cook it simply, and this is one of the simplest ways. I had meant to cook kare-kare (oxtail stew) with eggplants, but I never got around to getting all the other ingredients and the eggplant was starting to get too old, so I thought I had better cook it. This is a simple stirfy dish, using what is already in my pantry.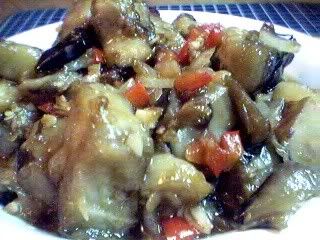
1 large eggplant (not the japanese type, the big round ones), cut into one inch pieces
1/2 red bell pepper (diced)
1/2 onion, sliced
2 cloves of garlic
1 teaspoon Ginger, minced
1 tablespoon Oyster sauce
1/2 teaspoon cornstarch dissolved in a bit of water
Oil
Peel and cut the egglants into 1 inch pieces, place in a collander and sprinkle with salt. Leave in the sink to drain while preparing the rest of the ingredients. Rinse the salt from the eggplants and shake any excess water off. You can also dry it by dabbing with a paper towel. Heat a wok or skillet and add about 2 tablespoons of oil. When the oil is hot, add the eggplants and brown each side but don't cook all the way until it is mushy; remove browned eggplants to a plate. You may have to add another tablespoon of oil if the eggplant absorbed too much oil. Sautee the garlic, ginger and onions until fragrant, then add the red bell peppers. Stir, and add the eggplants and oyster sauce. Cook for about a minute, this should render some liquid. If not add about 1/4 of a cup of water, or less depending on how much liquid you need to cook the eggplants the rest of the way. Just before removing from the heat, add the cornstarch mixture to thicken the sauce and adjust the seasoning with some salt and pepper if necessary.

Want the recipe for this Arroz Caldo? Visit the new Westernized Kusina of filipinas who have banded together to share recipes, tips, and ideas as they adapt Filipino recipes to their new environs and also to showcase their takes on local recipes wherever they may be living now.
People usually turn their noses up when you mention brussel sprouts, but this happens to be one of the girls' favorite vegetables. They even take the left overs for their lunch. They say they get a lot of "What is that?" and "Eewe!!", but they don't care, they just bring what they want to eat. I love that about them, and I hope they don't ever change. They always impress the teachers though. They can't believe they eat the vegetables that they do. Their other favorite thing to bring for lunch? Artichoke! But that will be another post.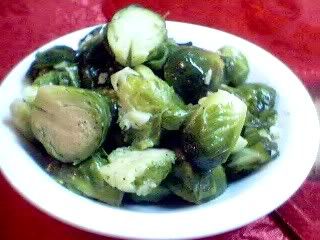
Again, another simple recipe.
1 pound FRESH brussel sprouts - contrary to the frozen foods manufacturers, brussel sprouts do not freeze well that is why so many people hate them.
2 cloves of garlic, minced
2 tablespoons of Olive Oil
Salt and Pepper to taste
Boil about 4 cups of water in a pot. In the meantime, trim the outer leaves from the brussel sprouts and cut them in half. Wash thoroughly and add to the boiling water and boil for 7 minutes. I usually put the timer on for this because when you over cook them, that's when they develop that foul odor. Plus, the girls just don't like the texture of overcooked vegetables. After the brussel sprouts have cooked for seven minutes, drain them in a collander and return the pot to the heat. Add the olive oil after residual moisture in the pot has evaporated. Sautee the garlic in the olive oil until fragrant, and return the drained brussel sprouts to the pot. Stir well to blend the flavors, and season with salt and pepper. Done!
The weather is starting to cool, and the growing season for our tomato plants have finally come to an end. We recently cleaned out the garden and took out the tomato plants to make way for whatever else we may decide to plant for the fall. The cherry tomato plant still had a lot of unripe tomatoes though, so rather than just throw them away with the plant, the girls and I decided to pull the fruits off the plant. I wasn't sure what to do with green tomatoes though. I know I probably could have made 'chow-chow', a type of relish made with green tomatoes and green bell peppers, but unlike Manang Kusinera who canned all her tomatoes herself, I don't have the time or patience for canning. So I decided to just find a way to cook with them. I decided to incorporate them into some baked chicken as an experiment, and it turned out quite well. We almost ate the whole thing again before I could take a picture, so Jade took a picture of this sorry looking wing which was all that was left.
The recipe is very simple and quick. My kind of thing, since I don't always have too much time to prepare dinner after I get home from work.
1 whole chicken, cut up into 8-10 pieces
1/2 large onion, sliced
4 cloves of garlic, minced
2 cups of green cherry tomatoes
2 tablespoons of fresh basil, chopped
Salt and pepper to taste
Place all the ingredients above in a baking pan and bake for 1 hour at 350 degrees or until the chicken is cooked through and the tomatoes and onions have cooked down to a nice consistency. I left the tomatoes whole (I didn't feel like going through the trouble of chopping them up) and it turned out to be a nice surprise. Not only did they impart a nice flavor to the chicken, it was great biting into them afterwards, and tasting the slightly sweet and tart flavor. The kids actually liked it!
We had these salmon croquettess sometime after we baked that whole side of salmon. I had to present it to the family a little differently, as they were already tired of the baked stuff and we still had a quarter of it left. Couldn't let it go to waste :) My mother in law used to love salmon croquettess, but she always used canned. Aside from my occational craving for Ligo sardines, I am really not that crazy about canned fish. So most of the time, I use fresh cooked salmon for this recipe. I used to follow the recipes that called for chopped onions, bell peppers and such, but the vegetables always tasted too raw for me. So I decided to try sauteeing it first one day, and it came out pretty good! Then I added a filipino twist to it by adding tomatoes, and it has been super ever since :)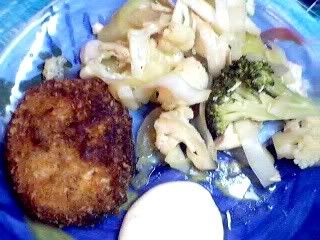
Flaked Salmon, about 3 cups
1 egg, beaten
1/2 onion, chopped
1/2 cup tomatoes, chopped
2 cloves garlic
1/2 green bell pepper, chopped
Salt and Pepper to taste
Bread Crumbs, seasoned
Oil for frying
Sautee the garlic, onions, tomatoes, and bell pepper in a bit of oil until the onions are translucent and most of the liquid from the tomatoes have evaporated. Season with salt and pepper to taste and let it cool.
When cool, add to the salmon along with the beaten egg and mix well. Form patties and roll them in bread crumbs and lay them on a cookie sheet. When done put the cookie sheet in the freezer; freeze the patties until firm. Once they have firmed up you can either fry them up or put them in a plastic bag to fry another day. This is a good way to keep the salmon from sitting in the refrigerator until it starts to grow something. Freezing keeps the patties from falling apart when you fry them. Pan fry them in a bit of oil until browned on both sides.
We usually serve these with the Thai sweet chili sauce or banana sauce, but we were out of both, so I tried the sour cream and wasabi sauce from Claudine, and it was terrific with the croquets. At least my husband and I liked it. The kids had theirs with ketchup.
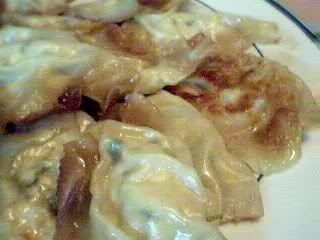
I was reading TingAlings post on siomai recently, and although it is our favorite dimsum item have never really tried making it before, so here is our first attempt at making it. Of course, I also turned to the Radical Chef for ideas, hers always turn out so pretty. Ours turned out pretty well (I had a lot of help), although I just improvised on the ingredients since I didn't have everything on hand. Here is our version:
Wonton wrappers
1/2 pound of ground pork
1 clove minced ginger
3 stalks of green onion, chopped finely
2 tablespoons of soy sauce
1 tablespoon of rice vinegar
1 egg, beaten
Mix everything until thoroughly blended. Stuff about a teaspoon of the mixture in each wonton wrapper and steam for 15-20 minutes. Serve immediately with lemon/soy dipping sauce.
The photos in this blog may load slowly or not at all today. Unfortunately, our photo host, photobucket.com is experiencing network problems.
So it has started cooling off, and the smell of fall is in the air; and I am just plain tired of fried chicken. Another family favorite to cook and eat is this chicken and dumpling, which I have learned is a staple in southern cooking. My husband has been missing good chicken and dumpling like his grandma used to make until I came across this recipe in Southern Living magazine. He says it comes very close to his grandmother's version. The girls like to help with this dish. Since they love working with dough, they are in charge of making the dumpling. 
Boil in a large stock pot:
1 1/2 gal. of water
2 stalks of celery
1 onion, quartered
1 Tbsp. salt
1 whole chicken (washed and excess fat trimmed)
Boil for one hour and turn off heat. Cool, and remove chicken. Skin and bone chicken and shred into bite sized pieces.
Strain chicken broth and discard the vegetables. Put 10 cups (or more) of the broth in a large pan. Any excess broth can be saved for later use. To the strained broth add:
4 Tbsp. chicken granules (or small bouillons)
1 tsp. pepper
Shredded chicken meat
Simmer while making dumpling.
For dumpling combine:
2 cups all-purpose flour
1 Tbsp. baking powder
1 tsp. salt
1/4 cup shortening
3/4 cup milk
Combine the dry ingredients in a bowl and cut in the shortening until the mixture becomes crumbly. Add the milk and mix until moistened. Do not over mix as this will make the dumpling tough. Roll dough on a lightly floured surface to 1/8 inch thickness. Cut into 3x2 inch strips and drop 1 at a time into the boiling broth. Stir gently until all strips are added. Reduce heat and simmer for 20 minutes, stirring occationally.
This is a recipe I used to make for breakfast potlucks at work and such, before I got married. It's great 'cause you have the option of starting it the night before and putting it together in the morning.
I haven't made it in a while since my husband does most of the baking now. But since I had some blueberries in the freezer, I thought I'd try out this recipe again and see how the kids like it. I made it for our Sunday brunch last week.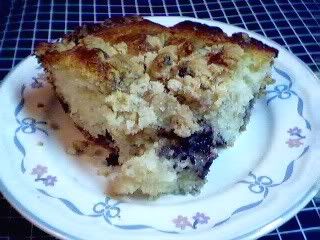
2 cups all-purpose flour
2/3 cup sugar
3 tsp. baking powder
1/2 tsp. salt
2 eggs
1 cup milk
1/2 cup butter or margarine, melted
2 Tbsp. lemon juice
2 cups frozen or fresh whole blueberries, unthawed
Crumb Topping (recipe at bottom)
Into a large mixing bowl, measure the flour, sugar, baking powder, baking soda, and salt. Stir well to blend.
Into another bowl or large measuring cup, combine eggs, milk, butter and lemon juice. Stir the liquid ingredients into the dry ingredients until blended. Pour mixture into buttered 13 x 9 inch baking dish. Sprinkle blueberries evenly over the batter.
TIP: If you roll the blueberries in flour before doing this, they won't sink to the bottom as much.
Sprinkle with the Crumb Topping and bake at 375 degrees F for 40 to 50 minutes. Serve warm.
CRUMB TOPPING
2/3 cup brown sugar
1/2 cup all-purpose flour
1/2 tsp. cinnamon
4 Tbsp. soft butter or margarine
1 cup chopped pecans or walnuts
Mix all ingredients in a bowl and stir until mixture is evenly blended and crumbly in appearance.
TIP: To prepare in advance, blend the dry ingredients the night before. Cover and let stand at room temperature. Combine the liquid ingredients and make the crumb topping. Cover both and refrigerate. The next morning mix the batter and assemble the cake as directed.
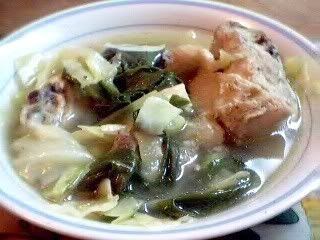 My family loves fried chicken, so I usually indulge them. I on the other hand get so tired of it, I make something else for myself. I take the backs and wing tips, which no one really likes but me anyway, and I usually make either tinola or arroz caldo. I didn't really have the usual vegetables for tinola, so I used cabbage and baby bok choy from our garden. It still came out pretty good.
Click here for the Chicken Tinola Recipe
Yeay! It's the weekend, the girls are still asleep, and I can play on the computer for a while. I'll try to catch up on posting some recipes. Here is the Pork and vegetable stir fry that we had over a week ago, when I cooked the Curried Pork.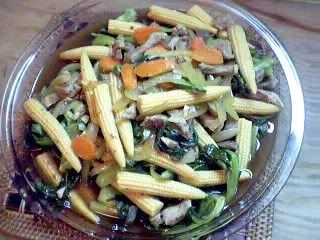
1/2 lb. pork meat, cut into strips
2 cloves of garlic, minced
1 small onion, sliced
1/2 cup celery or 1 rib, sliced
1 carrot, peeled and sliced
1/2 lb. (approximately) Pechay or baby bok choy (we got these from our garden)
1 can baby corn
2 tablespoons of vegetable or canola oil
2 tablespoons oyster sauce
1 teaspoon of cornstarch dissolved in 1/4 cup of water
Salt and Pepper to taste
In a wok (or any other pot you have), heat oil in high heat until it starts to smoke and stir in first the garlic then the onions and stir until fragrant. Add the meat and stir fry until it changes color. Add the celery and carrots and stirfry for another minute. Then add the bok choy and baby corn. Stir until the bok chow wilts and the baby corn is heated through. Add the oyster sauce and stir. If needed, add the cornstarch mixture to thicken the sauce. Add salt and pepper to taste.
We had chicken adobo for dinner last night. It was good, one of the best versions I've ever made. Unfortunately, we were all hungry and didn't get a chance to photograph it before it was all devoured. I ran out of regular soy sauce. When I went to pour some in, all I got was a couple of drops. So I used dark soy sauce instead. I didn't use as much as I usually do, 'cause I've done that before, and it gets too dark, plus the flavor is just slightly sweeter than regular soy. I don't know why, but it is. So I just put enough to color the dish, and I added salt to season.
I don't ever measure when I cook adobo, it's like second nature, and I cook it often when I am tired and want something easy to cook or when I am running short on time and need something cooked fast. Last night, it was both. Plus, I was trying to get dinner over with before 9:00 when Amazing Race 5 started. Actually, my target time was 8:00 as it was premiere night for Gilmore Girls, Jade's and my favorite show. Anyway, maybe Jade will take a photo of the few pieces of chicken that was left over and post it on here later. Here's what I did:
1 whole chicken, chopped in pieces
8 cloves of garlic or the whole head if its rather small
1 large onion, sliced
1/4 cup vinegar (I used cider vinegar)
3 tablespoons of dark soy sauce
1 teaspoon (approximately) whole peppercorns
4 bay leaves
1/2 cup of water
add a little more salt to taste
Put everything in a pot large enough to hold them, simmer for about 1 hour or until the juices have reduced and thickened slightly. Done! I just love easy dishes!
Ok, this isn't in very sequential order but mom put a link for the original home of the chicken, but here's the recipe. I did it on my own though, no one was there, hence forth the chicken was upside down until mom came home to check on it. Who knew that you were supposed to always keep the breast up? Or was it down? Hmmm....
Whole baked Chicken
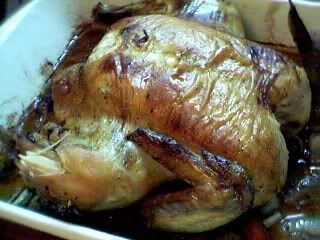
Fresh outta' the Oven
Ingredients/Materials/Equipment:
Large pan that will hold juices and support chicken
Stove and cutting board, large sharp chopping knife
1 whole chicken
2-4 whole carrots-skinned
2-4 stalks of celery
1 1/2-1 onion
2 cloves of garlic
Salt and pepper to taste
Dried herbs(prefforably chopped ones that you can just sprinkle on)
Preheat oven to 350 F.
Clean your chicken well, and place in large cooking pan. Chop celery, onion and carrots roughly in big chunks, on your cutting board. Then mince your garlic. Put veggies(not the garlic) around the chicken and inside of it as well. Sprinkle some of your herbs and garlic inside, on top and around, too. Then add your salt and pepper inside, out and around. Place in oven and cook until golden brown. Cool for about 3-5 minutes and then carve, and serve as desired.
This makes a good meal, although you sometimes can't avoid the bland middle meat but the meat that's been soaking in the juices at the bottom is really good. Hopefully it's as juicy as mine was.
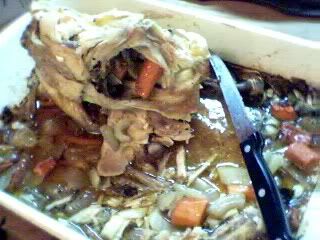
After dinner
*Remember to tie the legs together with twine to keep juicy and to cook evenly. Just remember to remove before serving.
This is my version of curried pork, which I cooked when the girls and I had a taste for a stir fried dish with plenty of vegetables.
Click here for the recipe for Curried Pork.


