Crab Stuffed Mushrooms

Posted by JMom | Friday, July 27, 2007 | , , , | 7 comments »

Crab Stuffed Mushrooms

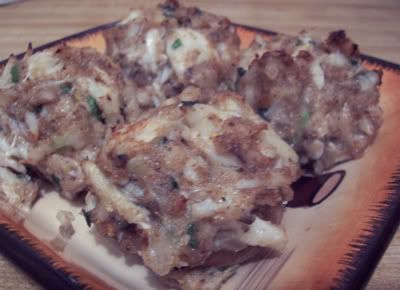
This is an old appetizer standby, and a favorite at parties. For parties, you probably should use smaller, bite sized mushrooms. This time though, I had some large mushrooms that were just waiting to be stuffed so I fixed this for dinner for me and the husband and still had plenty leftovers for lunch the next day. We had a nice big salad with plenty of tomatoes and cucumbers from the garden with these and they were delicious! It was a perfect, light summer dinner.

INGREDIENTS:
12 fresh mushrooms, large
3 Tablespoons butter
1/4 cup onions, chopped fine
2 cloves garlic, minced
1/4 cup spring onions, chopped
1 cup (a little over) lump crab meat
2 Tablespoons mirin
1/4 cup mayonaise
2 Tablespoons Parmesan Cheese
1/4 cup breadcrumbs
Salt/pepper to taste
Olive oil

Remove the mushroom stems and chop, set the mushroom caps aside. In a skillet, melt the butter and add the onions, garlic and chopped mushroom stemps. Saute' for a few minutes until they are fragrant, the onions are translucent and almost all liquids have evaporated. Stir in the spring onions, mirin, mayonnaise, parmesan cheese, and bread crumbs. Remove skillet from the heat and add the crab meat. Mix well and season with salt and pepper as needed.

Spoon the crab mixture into the mushroom caps and place them on a baking dish. Drizzle with olive oil and bake at 350 degrees F for 20 minutes.


Nachos

Posted by JMom | Tuesday, July 24, 2007 | , | 7 comments »

Photo Sharing and Video Hosting at Photobucket


This is one of the girls' favorite snack and they have become quite adept at making this snack themselves. We like to make our own tortilla chips by frying up leftover corn tortillas. They taste so much better than the store bought ones, we think.

For best taste, we like to make everything from scratch from the tomato salsa, the guacamole to the melted cheese.

MELTED CHEESE. If you've never melted cheese before, there are more than a couple of ways to do it. I will tell you about the two methods that the girls use. One is to simply melt it in the microwave; but if you're not careful you can end up drying the cheese out instead. To be on the safe side, add a little liquid, like a little salsa if you like it spicy, or a tablespoon of milk, to the cheese you are melting. Microwave on high for a couple of minutes, stop and stir. Keep doing this until the cheese is melted.
Another way is to melt it on top of the stove. Place the cheese and liquid in a small pot or saucepan and melt over low heat, stirring constantly until the cheese is melted.

GUACAMOLE. The taste of fresh avocados is hard to replicate and preserve so try to use fresh when you can. The pre-made and packaged guacamoles just cannot compare to freshly made ones. I have previously posted a recipe here. When the girls are being really lazy, they just mash up avocadoes and season it with salt pepper, and a spritz of lemon. You can adjust the guacamole recipe to suite your taste.

SALSA. All you have to do to make a refreshing salsa is mix together tomatoes, onions and cilantro. You can add hot peppers for spice. For this version of their nachos, the girls put the salsa ingredients through the blender and got a finer salsa. You can leave it chunky, or blend it as the girls did. Either way, it's still delicious.

Homemade Pork Tocino

Posted by JMom | Thursday, July 19, 2007 | , , | 15 comments »

TocinoThis recipe earned me the Rockin' Girl Blogger award from the Feisty Cook, Dexie. Although I've described the recipe in this blog previously, I've never really given a recipe since I don't ever measure when I'm making this. This time around though, at Peggy's request, I decided to measure out the marinade.

Continue to the Pork Tocino recipe.

Halo-Halo

Posted by JMom | Monday, July 16, 2007 | , , , | 7 comments »

It's summer time again for sure when you can't stay but a minute outside and you are already sweating and sticky without doing anything more strenous than lifting a glass of iced tea. I'm loving it though. It gives me an excuse to come up with cooling treats like Halo-halo.

Halo-Halo is the Filipino version of the summertime ice treat. Halo-halo, which means mix-mix literally, has its various renditions in different countries: Ice kakang in Malaysia, Es Teler in Indonesia, Ruam Mit in Thailand, Three Bean Drink/Rainbow Ice in Vietnam, and of course don't forget it's simpler sister, the Italian ice.

There are a great many versions of halo-halo so I won't put a recipe here, but here are more halo-halos on the web if you're interested in making your own.

  • Razon's Halo-halo - not a recipe but rather a review of one of the best places to get halo-halo. The girls and I tried this place at the Mall of Asia and loved it! It was simple but one of the best halo-halos we've ever tasted.
  • Halo-halo recipe from seasite
  • Market Manila Halo-Halo
  • Baby Rambutan's Halo-Halo

    As you may have noticed from the sampling of recipes for halo-halo, there isn't a strict recipe for it, put what flavors you like and enjoy!


  • Chicken marinating in pesto sauceOh it's grilling time again, and if you're blessed with lots of basil from your garden, it's probably pesto time also. We have been blessed with pesto for the second year in a row but as much as I love it, we just can't eat enough pasta and pesto to use it up. So we've been giving it away and using it up for other dishes like this grilled chicken marinated in pesto.

    Grilled Chicken with Pesto Marinade

    This is a very simple recipe. Just marinade the chicken pieces in pesto sauce for 30 minutes to overnight and grill.

    If you missed the pesto sauce recipe I use the first time, here it is again.

    2 Cloves of fresh garlic
    3 cups of fresh basil leaves, stems removed
    1/2 cup of pine nuts
    1/2 cup of grated parmesan cheese
    1/2 cup of olive oil

    In a blender, blend the above ingredients together until smooth. Done!

    COOKING TIP:
    From experience, I found that this sauce will last in the refrigerator for two to three weeks stored in an airtight container. You can also freeze this sauce and use it to flavor anything that requires a basil flavor. You can freeze small amounts for sauces in an ice cube tray then after they harden, transfer the cubes in a ziplocked freezer bag. It is best to freeze them in portions that you will need so you won't have to defrost the bags before using.

    If you are making a batch specifically for freezing, you can omit the parmesan cheese and pinenuts and add those fresh later when you are ready to use the basil.

    Clams with Black Bean Sauce

    Posted by JMom | Thursday, July 12, 2007 | , | 5 comments »

    Photobucket - Video and Image Hosting


    This is one of my favorite ways of cooking clams, and whenever I go to a Chinese restaurant that offers this, I never fail to order it. These clams, I found at Costco. Asi is my only daughter who shares this dish with me. She loves to put the sauce over her rice. When she and I are hungry, we can put away a whole order of this dish.

    Photobucket - Video and Image HostingWhen preparing fresh, live clams, make sure that all the shells are tightly closed. Or that they close up when you touch them. This means that the clams are still alive. There is nothing more disgusting than eating shellfish that has died before cooking. Their flesh deteriorates really fast that is why you have to cook them alive. Scrub the outside of the shells to make sure any mud, sand, or other impurities are removed. Wash them several times to get rid of any grit. It also helps if you soak clams in clean water for a few hours before cooking. This will allow them time to spit out any impurities like sand before cooking. Some suggests soaking them in milk too, but water works just as well I think.

    INGREDIENTS:Photobucket - Video and Image Hosting
    Fresh Clams (about 3 pounds or a big bowlfull)
    4 cloves garlic, chopped
    2 Tbsp. fresh ginger, minced
    1 large Onion, chopped roughly
    1 large Green Bell Pepper, cut into 1 inch squares
    1 bunch of Green Onions, cut into 1 inch length
    2 fresh hot chili peppers, cut into diagonal slices
    2 Tbsp. fermented Black Beans
    4 Tbsp. Oyster Sauce
    2 Tbsp. Oil
    1 tsp. cornstarch dissolved in water (about 1/4 cup or so)

    Heat oil in a wok or heavy bottomed pan. Saute' the chopped garlic and ginger for a minute then add the black beans. Lightly mash the beans to release the flavors and stirfy for another minute. Add the onions and bell peppers, stir, and add the clams and oyster sauce. Stir and cover the pot. Let it cook/steam for about 5 minutes until the clams have opened. Remove any clams that did not open up. The clams should have released some liquid at this point. Add the cornstarch mixture to thicken the sauce, stir in the chili peppers and green onions. Serve over rice. Lots of rice!

    Creamy Mango

    Posted by JMom | Monday, July 09, 2007 | , | 4 comments »

    Photo Sharing and Video Hosting at Photobucket


    Before the girls left for summer vacation, we bought a pack of ataulfo mangoes from Costco, which in the past have been very good, but this time they were not too sweet and were on the verge of getting over ripe. We decided to just scoop out all the flesh and make a puree out of it. We weren't really sure where we were going with this puree. I was seriously considering mango cake but just didn't have the energy for it. With dinner time looming and still had some prepping to do before our company arrived, we decided to just dump the whole thing in the ice cream maker and this is what came out.

    Like I said, I was feeling really lazy and didn't want to deal with making custard and such for a traditional ice cream recipe, so I omitted the eggs and just went for pure cream and mango puree mixture.

    4 ataulfo mangoes, pureed (about 2 cups)
    3 cups heavy cream
    1.5 cups caster sugar (super fine)
    pinch of salt

    Mix all the ingredients and pour into an ice cream maker. Process until set and serve. You can save leftovers, if any, in the freezer.


    Eggplant Fritata

    Posted by JMom | Thursday, July 05, 2007 | , , , | 2 comments »

    Eggplant Fritata

    The girls are off to summer at grandma's house so it is just me and hubby at home again. Sometimes when we are feeling particularly lazy we cook an egg dish for a quick supper and since I am still trying to clean out the fridge of odds and ends, we decided to have this for a light supper. I only had one Japanese eggplant left in the crisper, and not much other vegetables to pair it up with so eggplant fritata it is.

    Eggplant Fritata side 2

    Since Japanese eggplants are relatively mild and thin skinned, I simply sliced them and quickly pan fried the slices in a bit of olive oil. Set them aside and scramble about 4 eggs and season with salt and pepper. Heat a couple more tablespoons of oil in the skillet and pour the egg mixture in. Let the eggs set about halfway, then place the eggplance pieces on top of the egg. I also had some left over chopped tomatoes so I just threw those in too. Carefully turn the omelet over and cook on the other side. Serve.

    Tip on turning a whole omelet over: After the egg has set half way, meaning the bottom is fairly cooked but the top is still runny, slide the omelet onto a plate. Holding the plate in one hand, carefully cover it with the skillet facing down, quickly flip it over, remove the plate and return the skillet to the stove.

    Photo Sharing and Video Hosting at Photobucket

    The first to fluorish in our backyard garden are the green beans. We have had an abundance of them and we've cooked them every which way imaginable. This is one of the simplest ways of cooking green beans, and it's an old standby in our kitchen.

    INGREDIENTS:
    Green Beans
    Onion, chopped
    Tomatoes, chopped
    Olive Oil
    Salt and Pepper

    I didn't put any proportions on purpose because most of the time it depends on how much green beans I have on hand and what mood I'm in. Experiment with the proportions according to your taste. This is very basic, all you have to do is heat some oil and sautee the tomatoes and onions. After they have softened and become fragrant, add the green beans and season with salt and pepper. I don't add any water, I just wash the green beans prior to putting them in the pot and the moisture remaining on them is usually enough to cook them through. Cover and cook for five minutes. I put the timer on for this so as not to overcook the beans. We all have soggy green beans.

    ss_blog_claim=02daf6afd7df9760eca81610469cb81e