Turkey has been in the food blogging air this week as TingAling did her own trial run, and Drstel reminisced about Thanksgiving dinner past. It just so happened that the same day that TingAling posted her turkey dinner, I came home from the store with a turkey. It was on sale. My husband, who just loves turkey and can eat it at least once a month, has been asking for turkey and I have been trying to put his craving off until Thanksgiving. But since the turkey was on sale, I decided to indulge his craving.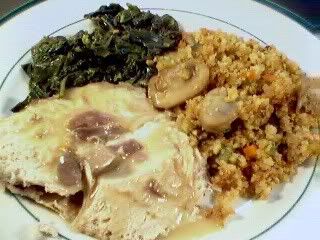
It is also the baby Clone's birthday tomorrow, so this was a sort of pre-birthday dinner.
First, the turkey: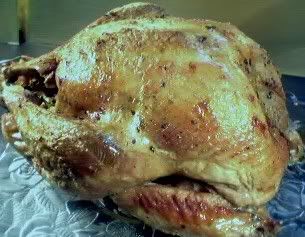
1 12 lb. Turkey
4 cloves of Garlic (peeled, leave whole)
1 Onion, quartered
1 Stalk of celery, cut into 1 inch lengths
1 Carrot, peeled and cut into 1 inch lengths
2-3 teaspoons of Salt, according to taste
1 teaspoon black Pepper
2 teaspoons dried Basil
1 teaspoon fennel seeds
1/2 teaspoon red pepper flakes
Wash turkey thoroughly and pat dry. In a small bowl, mix the salt, pepper and spices. Rub the turkey inside and out with the seasonings, and stuff the cavity with the garlic, onions, celery and carrots. Instead of the vegetables, some people would at this point stuff the turkey with stuffing, but I have gotten a bit paranoid about getting the stuffing up to a safe temperature, so I just cook the stuffing separately, out of the turkey. Bake the turkey at 325 degrees F for about 3 hours, basting occationally with the drippings. Let the turkey rest for at least 10 minutes before carving.
After you have washed your turkey, hopefully you found the bag of its gizard, liver, and neck usually tucked in the neck cavity of the turkey. The first time I ever cooked turkey was when my husband and I just got married and I was trying to cook something that he liked. I looked through my cookbooks, consulted my mom, and finally I was ready to attempt this turkey roasting fete. Well, they all said to remove the bag containing the gizard and liver. However, when I was washing the turkey, I didn't find this said bag inside the cavity, where I expected it to be, just like a chicken. So I asked my husband, who I thought had more experience with turkey, how come there was no bag inside? He said, maybe they forgot to put it in, so we both said, oh well, and went on. I fixed turkey and all the trimmings, and we had invited my sister, his brother and a couple of friend over for dinner. It was a huge success, everyone thought everything was perfect. That is, until it was time for seconds. My brother in law wanted seconds, so he goes to carve more turkey. Lo and behold, when he cut into the upper portion of the breast, he goes, "What is this?" and proceeded to pull out a plastic bag from the turkey!!! Needless to say, we all lost our appetite at this point. There was the plastic bag with the gizzard, liver, and turkey neck.
So if you find this darn bag before you roast the whole turkey, do take it out and wash the contents and place them in a separate pot to boil as this is what you will need if you are to make giblet gravy. Another southern thing.
To make gravy you will need:
Giblet and liver, boiled until tender and chopped up. Reserve the boiling liquid.
2 cloves of garlic
1/2 onion
1/2 cup of flour
1/4 cup of butter
2 cups of the reserved boiling liquid plus any drippings from the roasted turkey
Melt the butter in a saucepan and sautee the onions and garlic until the onions are tender or translucent. Add the flour and cook until it has turned into a light amber color. Add the broth and simmer until the gravy has thickened. If you use the drippings from the turkey, you usually don't have to add anymore salt as the flavor from the turkey should be enough to season your gravy. However, taste and adjust the seasoning to your liking.
We can't have turkey without stuffing, so here is my version this time. I say this time because this always changes depending on what mood I am in and what ingredients are available. Today, I used mushrooms, but I have been known to throw in some oysters, nuts, apples, you name it.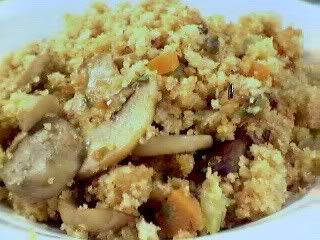
Click here for the recipe for this Cornbread and Mushroom Stuffing.
While the turkey is roasting, I cooked the Greens. Greens is a must for us, when we have turkey, they just go so well together. Greens is a typical southern dish, and most would not dream of mixing the type of greens together, but I find the flavor of mixed greens quite good so I usually mix collards, mustard, and turnip greens together. They didn't have turnip greens at the market this week though, so for this version I only used collards and turnip greens.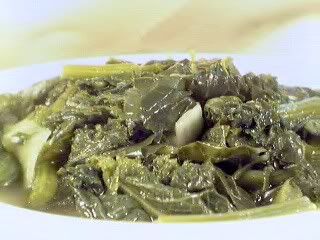
The most important thing about cooking greens is washing them. They tend to have a bit of dirt and sand still stuck to them, so if you don't like gritty greens, wash them thoroughly. I usually put them in a basin full of water and slosh them around to loosen the dirt, then repeat until there is no sediment at the bottom of the basin. Greens can be cooked just by themselves, of course, but this being the south, it wouldn't be quite right if it didn't have a piece of smoked pork in it. Most people use smoked ham hocks, but I prefer to use pieces of Virginia Country Ham. At most groceries here, they also sell smoked turkey which is what some people use especially if they are not into pork. To start, boil the smoked meat in about 4 cups of water in a large pot. Boil the meat while you are preparing the greens to give it a head start in getting tender and flavoring the broth. Many southern cooks don't add garlic and onions to their greens, but I do. So I put two cloves of garlic and 1/2 of a chopped onion to the boiling water. After washing the greens, it's time to trim them. For the mustard greens, all you have to do is to cut the ends off (stalk end) and cut up the leaves in one inch strips. For the collard greens, I take off the stalk completely and just keep the leafy portion, also cut into one inch strips. Add the greens to the pot, and simmer until tender. When the greens are tender, (after about 30 minutes) adjust the saltiness by adding more salt if needed. Add about a teaspoon of red pepper flakes, and two tablespoons of cider vinegar and simmer for an additional 10 minutes. Stir, and check the seasonings again and adjust as necessary.
For dessert, here is another traditional southern fare. I used the recipe on printed on the box of Nabisco 'Nilla Wafer Cookies.
35-45 "Nilla" Wafers
6-5 ripe bananas, sliced
3/4 cup sugar, divided
1/3 cup all purpose flour
Dash of salt
4 eggs, separated
2 cups milk
1/2 teaspoon vanilla extract
CUSTARD: Mix 1/2 cup sugar, flour, and salt in top of double boiler. Blend in 4 egg yolks and milk. Cook, uncovered, over boiling water stirring constantly until thickened. Remove from heat and stir in vanilla.
MERINGUE: In another bowl, beat egg whites until stiff but not dry; gradually add remaining 1/4 cup of sugar and beat unti stiff peaks form.
ASSEMBLY: To assemble, spread a small amount of the pudding on the bottom of a glass dish; cover with a layer of wafers ad a layer of sliced bananas. Pour 1/3 of custard over the bananas. Continue to layer wafers, bananas and custard to make three layers of each, ending with custard. Spoon the meringue on top of the custard spreading to cover the entire surface and sealing well to the edges.
BAKE: Bake at 350 degrees F for 10-12 minutes or until meringue is lightly browned. Cool slightly or refrigerate, and serve.
For us, I doubled the recipe as the kids and the hubby always like to have leftovers. If I make one batch, it is only good for one sitting.
In honor of the Clone (my youngest daughter) whose birthday is tomorrow and who loves anything with pasta, this is for you, baby! We actually had this last week, as we have to have something akin to spaghetti at least once a week for the clone, but I just haven't had time to post much since it has been a hectic week for me at work. This is you basic tomato sauce, only with italian sausage instead of plain ground meat.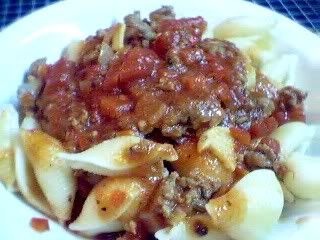
My basic spaghetti sauce recipe is here. I took the sausage out of the casing, since for some reason the Clone will not eat sliced sausages in her sauce. She like it this way though.
One of the simplest ways to cook eggplants is to cook it simply, and this is one of the simplest ways. I had meant to cook kare-kare (oxtail stew) with eggplants, but I never got around to getting all the other ingredients and the eggplant was starting to get too old, so I thought I had better cook it. This is a simple stirfy dish, using what is already in my pantry.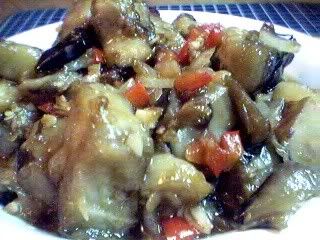
1 large eggplant (not the japanese type, the big round ones), cut into one inch pieces
1/2 red bell pepper (diced)
1/2 onion, sliced
2 cloves of garlic
1 teaspoon Ginger, minced
1 tablespoon Oyster sauce
1/2 teaspoon cornstarch dissolved in a bit of water
Oil
Peel and cut the egglants into 1 inch pieces, place in a collander and sprinkle with salt. Leave in the sink to drain while preparing the rest of the ingredients. Rinse the salt from the eggplants and shake any excess water off. You can also dry it by dabbing with a paper towel. Heat a wok or skillet and add about 2 tablespoons of oil. When the oil is hot, add the eggplants and brown each side but don't cook all the way until it is mushy; remove browned eggplants to a plate. You may have to add another tablespoon of oil if the eggplant absorbed too much oil. Sautee the garlic, ginger and onions until fragrant, then add the red bell peppers. Stir, and add the eggplants and oyster sauce. Cook for about a minute, this should render some liquid. If not add about 1/4 of a cup of water, or less depending on how much liquid you need to cook the eggplants the rest of the way. Just before removing from the heat, add the cornstarch mixture to thicken the sauce and adjust the seasoning with some salt and pepper if necessary.

Want the recipe for this Arroz Caldo? Visit the new Westernized Kusina of filipinas who have banded together to share recipes, tips, and ideas as they adapt Filipino recipes to their new environs and also to showcase their takes on local recipes wherever they may be living now.
People usually turn their noses up when you mention brussel sprouts, but this happens to be one of the girls' favorite vegetables. They even take the left overs for their lunch. They say they get a lot of "What is that?" and "Eewe!!", but they don't care, they just bring what they want to eat. I love that about them, and I hope they don't ever change. They always impress the teachers though. They can't believe they eat the vegetables that they do. Their other favorite thing to bring for lunch? Artichoke! But that will be another post.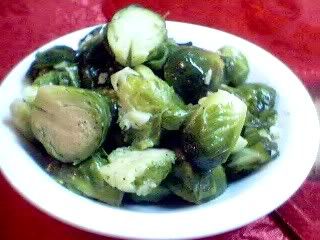
Again, another simple recipe.
1 pound FRESH brussel sprouts - contrary to the frozen foods manufacturers, brussel sprouts do not freeze well that is why so many people hate them.
2 cloves of garlic, minced
2 tablespoons of Olive Oil
Salt and Pepper to taste
Boil about 4 cups of water in a pot. In the meantime, trim the outer leaves from the brussel sprouts and cut them in half. Wash thoroughly and add to the boiling water and boil for 7 minutes. I usually put the timer on for this because when you over cook them, that's when they develop that foul odor. Plus, the girls just don't like the texture of overcooked vegetables. After the brussel sprouts have cooked for seven minutes, drain them in a collander and return the pot to the heat. Add the olive oil after residual moisture in the pot has evaporated. Sautee the garlic in the olive oil until fragrant, and return the drained brussel sprouts to the pot. Stir well to blend the flavors, and season with salt and pepper. Done!
The weather is starting to cool, and the growing season for our tomato plants have finally come to an end. We recently cleaned out the garden and took out the tomato plants to make way for whatever else we may decide to plant for the fall. The cherry tomato plant still had a lot of unripe tomatoes though, so rather than just throw them away with the plant, the girls and I decided to pull the fruits off the plant. I wasn't sure what to do with green tomatoes though. I know I probably could have made 'chow-chow', a type of relish made with green tomatoes and green bell peppers, but unlike Manang Kusinera who canned all her tomatoes herself, I don't have the time or patience for canning. So I decided to just find a way to cook with them. I decided to incorporate them into some baked chicken as an experiment, and it turned out quite well. We almost ate the whole thing again before I could take a picture, so Jade took a picture of this sorry looking wing which was all that was left.
The recipe is very simple and quick. My kind of thing, since I don't always have too much time to prepare dinner after I get home from work.
1 whole chicken, cut up into 8-10 pieces
1/2 large onion, sliced
4 cloves of garlic, minced
2 cups of green cherry tomatoes
2 tablespoons of fresh basil, chopped
Salt and pepper to taste
Place all the ingredients above in a baking pan and bake for 1 hour at 350 degrees or until the chicken is cooked through and the tomatoes and onions have cooked down to a nice consistency. I left the tomatoes whole (I didn't feel like going through the trouble of chopping them up) and it turned out to be a nice surprise. Not only did they impart a nice flavor to the chicken, it was great biting into them afterwards, and tasting the slightly sweet and tart flavor. The kids actually liked it!
We had these salmon croquettess sometime after we baked that whole side of salmon. I had to present it to the family a little differently, as they were already tired of the baked stuff and we still had a quarter of it left. Couldn't let it go to waste :) My mother in law used to love salmon croquettess, but she always used canned. Aside from my occational craving for Ligo sardines, I am really not that crazy about canned fish. So most of the time, I use fresh cooked salmon for this recipe. I used to follow the recipes that called for chopped onions, bell peppers and such, but the vegetables always tasted too raw for me. So I decided to try sauteeing it first one day, and it came out pretty good! Then I added a filipino twist to it by adding tomatoes, and it has been super ever since :)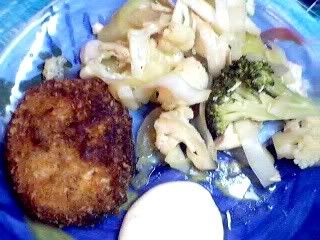
Flaked Salmon, about 3 cups
1 egg, beaten
1/2 onion, chopped
1/2 cup tomatoes, chopped
2 cloves garlic
1/2 green bell pepper, chopped
Salt and Pepper to taste
Bread Crumbs, seasoned
Oil for frying
Sautee the garlic, onions, tomatoes, and bell pepper in a bit of oil until the onions are translucent and most of the liquid from the tomatoes have evaporated. Season with salt and pepper to taste and let it cool.
When cool, add to the salmon along with the beaten egg and mix well. Form patties and roll them in bread crumbs and lay them on a cookie sheet. When done put the cookie sheet in the freezer; freeze the patties until firm. Once they have firmed up you can either fry them up or put them in a plastic bag to fry another day. This is a good way to keep the salmon from sitting in the refrigerator until it starts to grow something. Freezing keeps the patties from falling apart when you fry them. Pan fry them in a bit of oil until browned on both sides.
We usually serve these with the Thai sweet chili sauce or banana sauce, but we were out of both, so I tried the sour cream and wasabi sauce from Claudine, and it was terrific with the croquets. At least my husband and I liked it. The kids had theirs with ketchup.
I was reading TingAlings post on siomai recently, and although it is our favorite dimsum item have never really tried making it before, so here is our first attempt at making it. Of course, I also turned to the Radical Chef for ideas, hers always turn out so pretty. Ours turned out pretty well (I had a lot of help), although I just improvised on the ingredients since I didn't have everything on hand. Here is our version:
Wonton wrappers
1/2 pound of ground pork
1 clove minced ginger
3 stalks of green onion, chopped finely
2 tablespoons of soy sauce
1 tablespoon of rice vinegar
1 egg, beaten
Mix everything until thoroughly blended. Stuff about a teaspoon of the mixture in each wonton wrapper and steam for 15-20 minutes. Serve immediately with lemon/soy dipping sauce.


